
164-R1511 or equivalent
SECTION 501-08: Exterior Trim and Ornamentation
| 2014 Mustang Workshop Manual
|
REMOVAL AND INSTALLATION
| Procedure revision date: 01/07/2013
|
| Deluxe Windshield Removal Tool
164-R1511 or equivalent |
| Item | Specification |
|---|---|
| Dow Urethane Adhesive
Betaseal™ Express | — |
| Dow Urethane One Step Glass Primer
Betaprime™ 5500 / 5500A / 5500SA | — |
| Sika Urethane Adhesive
Sika Tack ASAP | — |
| Sika Urethane Metal and Glass Primer
Sika 206 G+P | — |
| Item | Part Number | Description |
|---|---|---|
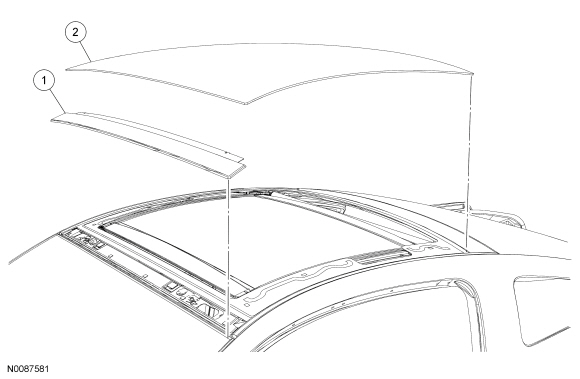
| 1 | 51940 | Front roof applique |
| 2 | 50054 | Roof glass panel |
Removal
 WARNING: Wear eye and ear protection when servicing a vehicle. Failure to follow this instruction may result in serious personal injury.
WARNING: Wear protective gloves when handling components or parts that have pointed or sharp edges. Failure to follow this instruction may result in serious personal injury.
NOTE: The front roof applique will be damaged during the removal procedure. Install a new front roof applique.
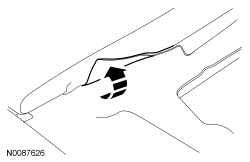
NOTE: Lubricate the urethane adhesive with water to aid the Deluxe Windshield Removal Tool when cutting the urethane adhesive.
Using the Deluxe Windshield Removal Tool, begin cutting from either end towards the middle of the car. For additional information on the urethane adhesive path, refer to the illustration.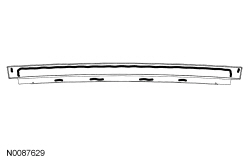
Installation
WARNING: Repair any corrosion found on the pinch weld. The pinch weld is a structural component of the vehicle. Corrosion left unrepaired may reduce the structural integrity of the vehicle. Failure to follow this instruction may result in serious injury to vehicle occupant(s).
NOTICE: The entire installation procedure requires the aid of an assistant. Failure to follow this direction may result in damage to the components.
NOTICE: The urethane adhesive has a 10-minute skin time. The entire installation process must be completed in no more than 10 minutes (L-shaped bead, applique bead, halo bead and all components installed). Failure to complete the installation process in the allotted time may result in a water leak, which may cause damage to the interior components.
NOTE: Avoid scratching the pinch weld. Repair all minor scratches or exposed metal on the pinch weld following manufacturer's instructions. Use the same brand pinch weld primer, glass primer and urethane adhesive.
NOTE: To make sure the new urethane adhesive bonds correctly to the original equipment urethane adhesive, the roof glass panel and appliques must be installed within 2 hours of trimming the original urethane adhesive bead.
Using an appropriate cutting tool, trim the urethane adhesive leaving a 1 mm to 2 mm (0.04 in to 0.08 in) base of original equipment urethane on the pinch weld and on the mating surface of the rear roof glass applique.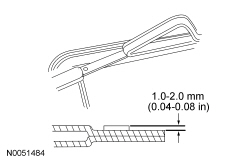
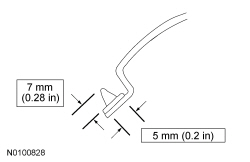
NOTE: The urethane adhesive bead needs to be 5 mm (0.20 in) wide and 7 mm (0.28 in) tall.
Cut the urethane adhesive applicator tip to specification.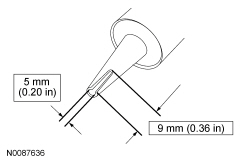
NOTE: Use either a high-ratio, electric or battery-operated caulk gun that will apply the urethane adhesive with less effort and continuous bead. Make sure there are no gaps in the bead.
Apply L-shaped beads of urethane adhesive to both corners of the roof glass applique mating surface.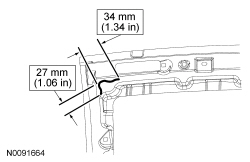
NOTE: The roof glass applique has a locator pin to make sure of proper fore and aft alignment. The applique must be centered side-to-side.
Install the glass roof applique.NOTICE: Before positioning the roof glass panel, open the vehicle windows to prevent the air pressure of closing doors from affecting the adhesive bond.
Carefully install the glass roof panel.