SECTION 501-18: Convertible Top
| 2014 Mustang Workshop Manual
|
REMOVAL AND INSTALLATION
| Procedure revision date: 01/07/2013
|
Convertible Top Assembly
Removal
NOTICE:
Removal, installation and handling of the convertible top requires an assistant or damage to the convertible top or vehicle may occur.
NOTICE:
Use care when working around or handling the convertible top material to avoid scratching or creasing the material.
NOTICE:
Use care when handling the convertible top material to avoid damaging the rear glass. If damaged or broken, the rear glass cannot be replaced and will require replacement of the convertible top material.
NOTICE:
Light scratches in the convertible top material can be removed using isopropyl alcohol and 600-grit sandpaper or steel wool. Use light pressure, polishing in a circular motion. Use care not to use excessive pressure. Do not use power tools, as these permanently damage the convertible top material. Heavy scratches require replacement of the convertible top material.
NOTICE:
Light creases in the convertible top material can be removed by applying water to the creased area, and pulling the creased area flat, while applying mild heat from a heat gun. Use care not to apply excessive heat, as this permanently damages the convertible top material. Heavy creases may require replacement of the convertible top material.
NOTE:
Removal:
 Click here to view a video version of this procedure.
Installation:
Click here to view a video version of this procedure.
- Remove the well sling channel and the 4 pin-type retainers from the rear seat backrest.
- Remove the rear seat backrest. For additional information, refer to
Section 501-10
.
- If equipped, remove the pushpins for the sound pads.
- Remove the LH and RH rear quarter trim panels. For additional information, refer to
Section 501-05
.
- Remove the LH and RH inner quarter window belt line seal bolts and brackets.
- Disconnect the convertible top ajar switch electrical connector (RH side).
- Disconnect the rear window defrost electrical connector (middle of vehicle under soundpad).
- Momentarily place the convertible top switch in the raise position to release the tension on the convertible top frame.
- Remove the LH and RH hydraulic lift cylinder bolts and brackets.
- Remove the LH and RH clevis-to-hydraulic-lift cylinder rod bolts.
- Position the hydraulic lift cylinders aside.
- Remove the LH and RH bolts attaching the L-brackets to the quarter panel.
- Loosen the LH and RH pivot bracket rear bolts and remove the 4 pivot bracket front bolts (2 per side).
- Remove the LH and RH convertible top frame No. 5 bow pivot bolts.
- Push in on the LH and RH pivot bracket to release the locator pin then upward to release the pivot bracket from the LH and RH pivot bracket rear bolts
NOTICE:
Do not compress the convertible top frame number 5 bow more than necessary to remove it from the vehicle. Excessive compression can damage the convertible top frame number 5 bow.
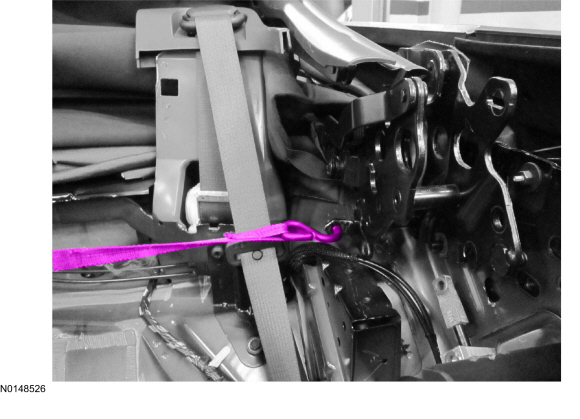
NOTE:
Driver side shown, passenger side similar.
Place a cargo strap or other suitable device at the convertible top frame number 5 bow bracket and compress the convertible top frame number 5 bow.
- For 2005 to 2009 model year, compress the convertible top frame number 5 bow approximately 76.2 mm (3 in) .
- For 2010 model year and up, compress the convertible top frame number 5 bow approximately 177.8 mm (7 in) .
- After compressing the number 5 bow, with an assistant, slightly raise the top by hand, holding it by the number 2 bow and shift it rearward over the trunk.
- Lift the bottom edge of the window glass over the seat belt towers.
- With an assistant, remove the convertible top assembly from the vehicle.
Installation
NOTICE:
Use care when cutting the tie straps or damage to the convertible top material may occur.
Cut and remove the number 5 bow and side rail tie straps.
NOTICE:
Use care when cutting the tie straps or damage to the convertible top material may occur.
Cut and remove the well sling tie strap.
- Place a cargo strap or other suitable device at the convertible top frame number 5 bow bracket and compress the convertible top frame number 5 bow.
- For 2005 to 2009 model year, compress the convertible top frame number 5 bow approximately 76.2 mm (3 in) .
- For 2010 model year and up, compress the convertible top frame number 5 bow approximately 177.8 mm (7 in) .
NOTICE:
Do not compress the convertible top frame No. 5 bow more than necessary to install it to the vehicle. Excessive compression can damage the convertible top frame No. 5 bow.
With an assistant, position the convertible top assembly into the vehicle.
- Slightly lift up on the number 2 bow and shift the assembly rearward over the trunk. Tuck the rear window glass behind the seat belt towers and then fully lower the convertible top.
- Slowly release the convertible top frame number 5 bow, while aligning the guide pins on the convertible top frame with the holes in the rear quarter panels.
- Install the LH and RH convertible top frame number 5 bow pivot bolts. Raise the convertible top by hand half way to align the number 5 bow pivot bolt brackets if necessary.
- Tighten to 9 Nm (80 lb-in).
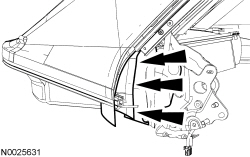
- Position the water diverters as shown, making sure the edges overlap completely, and the diverters are not caught between the brackets and the body.
- Install the LH and RH pivot bracket bolts.
- Tighten to 48 Nm (35 lb-ft).
- Operate the convertible top by hand, to make sure the top operates freely, without binding.
NOTE:
It may be necessary to momentarily press the convertible top switch to align the cylinders.
Position the LH and RH hydraulic lift cylinders.
- Install the LH and RH clevis-to-hydraulic lift cylinder rod bolts.
- Tighten to 20 Nm (177 lb-in).
- Install the LH and RH hydraulic lift cylinder brackets and bolts.
- Tighten to 20 Nm (177 lb-in).
- Connect the convertible top ajar switch electrical connector.
- Install the LH and RH bolts attaching the L-brackets to the quarter panel.
- Tighten to 27 Nm (20 lb-ft).
- Install the LH and RH inner quarter window belt line seal brackets and bolts.
- Install the LH and RH rear quarter trim panels. For additional information, refer to
Section 501-05
.
- Recheck the position of the water diverters, and adjust as necessary for correct placement.
- Connect the rear window defrost electrical connector.
- If equipped, install the pushpins for the sound pads.
- Install the rear seat backrest. For additional information, refer to
Section 501-10
.
NOTE:
It will require force to latch the convertible top after a new convertible top material is installed.
Fully raise the convertible top.
- Position the well sling channel and install the 4 pin-type retainers to the rear seat backrest.
- Make sure the door glass and quarter glass correctly seal against the convertible top side rail. If adjustment is necessary, refer to
Section 501-11
.