SECTION 501-20B: Supplemental Restraint System
| 2014 Mustang Workshop Manual
|
REMOVAL AND INSTALLATION
| Procedure revision date: 01/07/2013
|
Side Airbag
General Equipment
| Hog ring pliers
|
Removal
 WARNING: Always carry a live airbag with the deployment door, trim cover or tear seam pointed away from the body. Do not place a live airbag down with the deployment door, trim cover or tear seam facing down. Failure to follow these instructions may result in serious personal injury in the event of an accidental deployment.
 WARNING: Never probe the electrical connectors on airbag, Safety Canopy or side air curtain assemblies. Failure to follow this instruction may result in the accidental deployment of these assemblies, which increases the risk of serious personal injury or death.
 WARNING: If the seat side airbag cover has been damaged or separated from its mounting, or if the airbag material has been exposed, install a new seat side airbag assembly. Never try to repair the seat side airbag assembly. Failure to follow these instructions may result in the seat side airbag deploying incorrectly, which increases the risk of serious personal injury or death in a crash.
 WARNING: Front seat backrest trim covers installed on seats equipped with seat side airbags cannot be repaired. A new trim cover must be installed. Cleaning is permissible. Failure to follow these instructions may result in the seat side airbag deploying incorrectly and increase the risk of serious personal injury or death in a crash.
NOTE:
If a side air bag deployment took place, install a new seat backrest foam pad, cover, side air bag module, nuts, and seat backrest frame (if necessary).
All vehicles
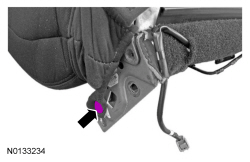
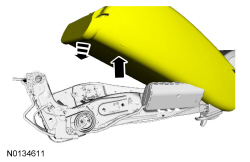
- Remove the front seat backrest. Refer to
Section 501-10
.
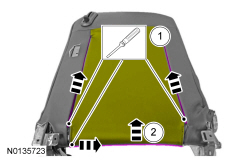
Vehicles with high-back seats
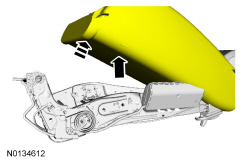
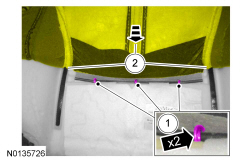
- Screwdriver.
- -
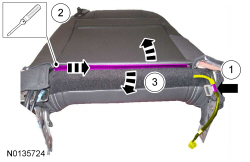
Vehicles with low-back seats
- If equipped with heated seat.
- Screwdriver.
- -
All vehicles
NOTICE:
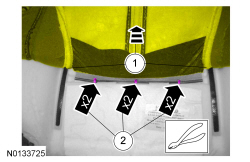
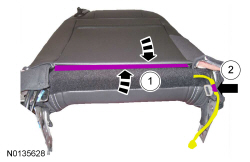
Use care when separating the backrest cover from the hook-and-loop strips. The hook-and-loop strips can be torn from the backrest foam pad.
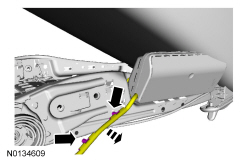
- -
- Side cutter pliers.
Installation
All seats
 WARNING: Inspect the seat side air bag, air bag cavity, mounting surface and deployment chute for damage or the presence of foreign material. Remove all foreign material. Install a new side air bag if it is damaged. Install a new seat backrest trim cover and deployment chute if the deployment chute is damaged. Position the deployment chute properly and make sure it is closed. Failure to follow these instructions may result in the seat side air bag deploying incorrectly and increase the risk of serious personal injury or death in a crash.
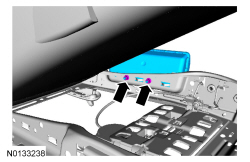
- Tighten to 6 Nm (53 lb-in).
NOTICE:
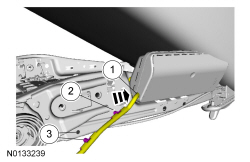
Feed any excess side air bag module wire harness and protective cover into the side air bag module shell. Failure to feed any excess wire harness and protective cover into the side air bag module shell can cause damage to the wire harness.
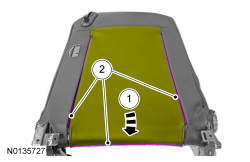
 WARNING: To correctly retain the backrest trim cover, always install 2 hog rings when attaching the backrest trim cover wire to the listing wire in each foam pad window. Failure to follow this instruction may result in the seat side air bag module deploying incorrectly and increases the risk of serious personal injury or death in a crash.
General Equipment: Hog ring pliers.
Vehicles with low-back seats
- -
- If equipped with heated seat.
Vehicles with high-back seats
All vehicles
- Install the front seat backrest. Refer to
Section 501-10
.
Passenger seat
 WARNING: Make sure the front passenger seat repair is complete, the seat and all attached components (head restraint, seat side shield, etc.) are correctly assembled, and the seat is correctly installed to the vehicle before using System Reset to rezero the seat weight. Failure to follow these instructions may result in incorrect operation of the occupant classification system (OCS) and increases the risk of serious personal injury or death in a crash.
NOTICE:
To prevent system failure, the following precautions must be taken before carrying out the Occupant Classification System (OCS) reset:
- Make sure the voltage to the
sensor is above 8 volts and less than 18 volts.
- Make sure the
is not at a temperature below 6°C (42°F) or above 36°C (97°F) when initiating the
reset. If the vehicle has been exposed to extreme cold or hot temperatures, the vehicle must be exposed and kept at a temperature within the limits, 6°C to 36°C (42°F to 97°F) for a minimum of 30 minutes.
- Make sure nothing is present on the passenger seat before carrying out the
reset and nothing is placed on the seat during the process.
- Make sure a minimum 8-second time period has passed after cycling the ignition ON before carrying out the
reset.
Carry out the Occupant Classification System (OCS) reset.
- If the first system reset attempt was unsuccessful, make sure no Occupant Classification System Module (OCSM) DTCs are present. If DTC C1941 is the only one retrieved, it will clear upon a successful system reset. All other
DTCs must be diagnosed and repaired before carrying out the
reset.
- Carry out a thorough inspection of the following and repair any concerns found.
- connector and wiring for damage
- Pressure sensor hose for kinks and/or damage
- Seat-related wiring harness and body wiring harness terminals and connectors for damage
- Carry out a second
reset. If the system reset was unsuccessful, install a new
service kit. For additional information, refer to the Removal and Installation procedures in
Section 501-20B
.
- Prove out the
as follows:
Turn the ignition from ON to OFF. Wait 10 seconds, then turn the ignition ON and monitor the air bag warning indicator with the air bag modules installed. The air bag warning indicator will light continuously for approximately 6 seconds and then turn off. If an air bag
fault is detected, the air bag warning indicator will:
- fail to light.
- remain lit continuously.
- flash.
The flashing might not occur until approximately 30 seconds after the ignition has been turned from the OFF to the ON position. This is the time required for the
to complete the testing of the
. If the air bag warning indicator is inoperative and a
fault exists, a chime will sound in a pattern of 5 sets of 5 beeps. If this occurs, the air bag warning indicator and any
fault discovered must be diagnosed and repaired.
Clear all
and
Continuous Memory Diagnostic Trouble Codes (CMDTCs).
 WARNING: Always carry a live airbag with the deployment door, trim cover or tear seam pointed away from the body. Do not place a live airbag down with the deployment door, trim cover or tear seam facing down. Failure to follow these instructions may result in serious personal injury in the event of an accidental deployment.
