SECTION 501-35: Body Repairs
| 2014 Mustang Workshop Manual
|
DESCRIPTION AND OPERATION
| Procedure revision date: 01/07/2013
|
Body
 WARNING: Collision damage repair must conform to the instructions contained in this workshop manual. Replacement components must be new, genuine Ford Motor Company parts. Recycled, salvaged, aftermarket or reconditioned parts (including body parts, wheels or safety restraint components) are not authorized by Ford.
Departure from the instructions provided in this manual, including alternate repair methods or the use of substitute components, risks compromising crash safety. Failure to follow these instructions may adversely affect structural integrity and crash safety performance, which could result in serious personal injury to vehicle occupants in a crash.
The body consists of the following:
- Unibody construction
- Two door coupe
- Two door convertible
- Lightweight steel material
- Steel radiator support assembly
- High-Strength Low Alloy (HSLA), high-strength and mild steels
- Aluminum hood
- Bolted, removable front fenders, hinged doors and hood
- Front subframe assembly which houses steering and suspension components and provides structural support
- Steel fenders
- Steel doors
- Steel luggage compartment lid
- Ultra High Strength Steel (UHSS), roll-formed, front and rear bumper beams
- Rear underbody bracing on convertible models provides additional structural support
- Structural adhesive used in body side, rocker reinforcements, A-pillar and underbody
- Sound deadener material used on floor pan
For dimensional information, refer to the following illustrations:
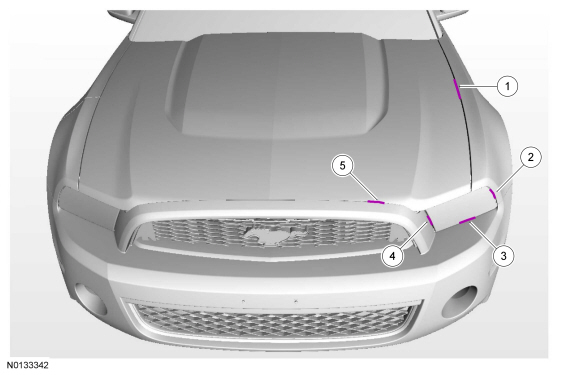
Body Margins
NOTE:
Dimensions apply to right and left side.
NOTE:
Coupe body style shown, convertible similar.

| Item
| Description
| Specification
| Flushness Specification
|
|---|
| 1
| Hood to fender
| 3.6 mm (0.141 in) ± 1.5 mm (0.059 in)
| -0.75 mm (-0.029 in) ± 1.5 mm (0.059 in)
|
| 2
| Headlamp to fender
| 2.7 mm (0.106 in) ± 2.0 mm (0.078 in)
| —
|
| 3
| Headlamp to fascia, lower
| 2.7 mm (0.106 in) ± 2.0 mm (0.078 in)
| —
|
| 4
| Headlamp to fascia, inboard
| 2.7 mm (0.106 in) ± 2.0 mm (0.078 in)
| —
|
| 5
| Hood to fascia
| 3.8 mm (0.149 in) ± 2.5 mm (0.098 in)
| 0.0 mm ( in) ± 2.5 mm (0.098 in)
|
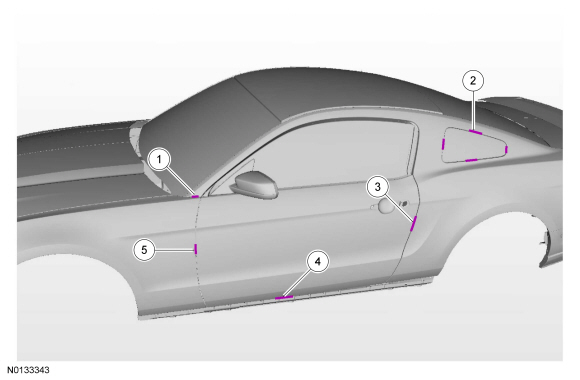
Body Margins

| Item
| Description
| Specification
| Flushness Specification
|
|---|
| 1
| Fender to A-pillar
| 3.0 mm (0.118 in) ± 1.5 mm (0.059 in)
| —
|
| 2
| Quarter glass to quarter panel (all locations)
| 3.0 mm (0.118 in) ± 1.5 mm (0.059 in)
| 3.0 mm (0.118 in) ± 1.7 mm (0.066 in)
|
| 3
| Door to quarter panel
| 4.0 mm (0.157 in) ± 1.5 mm (0.059 in)
| 0.0 mm ( in) ± 1.5 mm (0.059 in)
|
| 4
| Rocker moulding to door
| 6.0 mm (0.236 in) ± 2.0 mm (0.078 in)
| —
|
| 5
| Door to fender
| 4.0 mm (0.15 in) ± 1.5 mm (0.059 in)
| 0.5 mm (0.019 in) ± 1.5 mm (0.059 in)
|
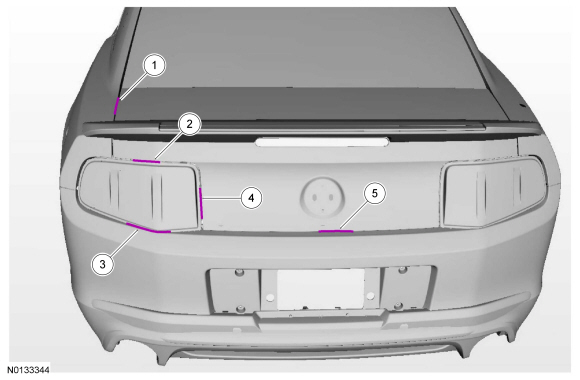
Body Margins

| Item
| Description
| Specification
| Flushness Specification
|
|---|
| 1
| Decklid to quarter panel
| 4.0 mm (0.157 in) ± 1.5 mm (0.059 in)
| -1.0 mm (-0.039 in) ± 1.5 mm (0.059 in)
|
| 2
| Tail lamp assembly to deck lid, upper
| 4.0 mm (0.15 in) ± 1.5 mm (0.059 in)
| 0.0 mm ( in) ± 1.5 mm (0.059 in)
|
| 3
| Tail lamp assembly to fascia
| 3.0 mm (0.118 in) ± 2.5 mm (0.098 in)
| —
|
| 4
| Tail lamp assembly to decklid, inboard
| 4.0 mm (0.15 in) ± 2.5 mm (0.098 in)
| —
|
| 5
| Deck lid to fascia
| 6.0 mm (0.236 in) ± 2.5 mm (0.098 in)
| —
|
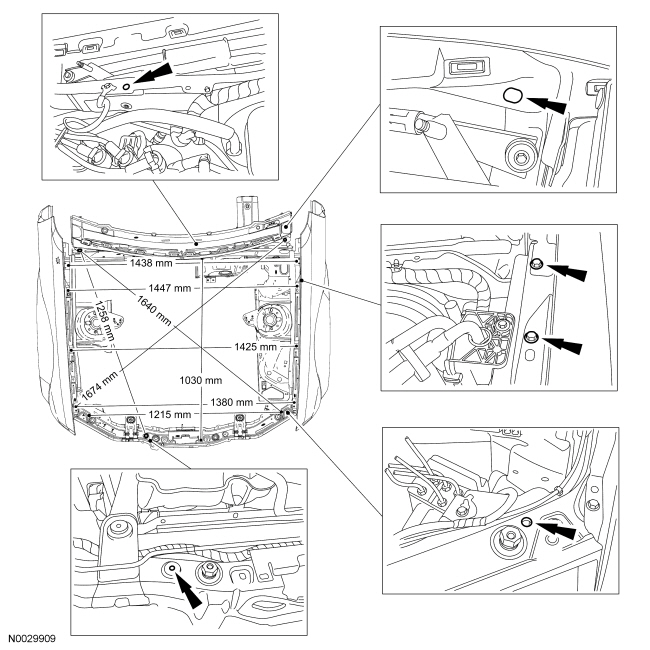
Underhood Dimensions
NOTE:
Measurements are obtained on center, unless otherwise indicated.

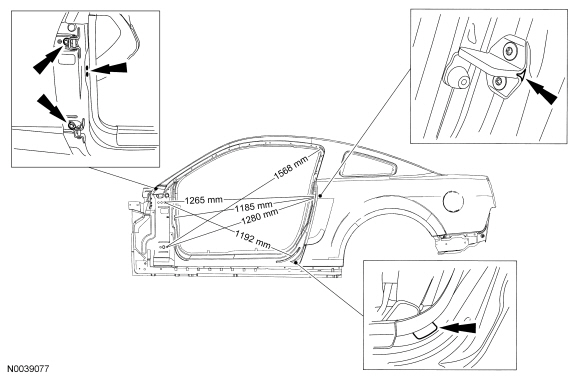
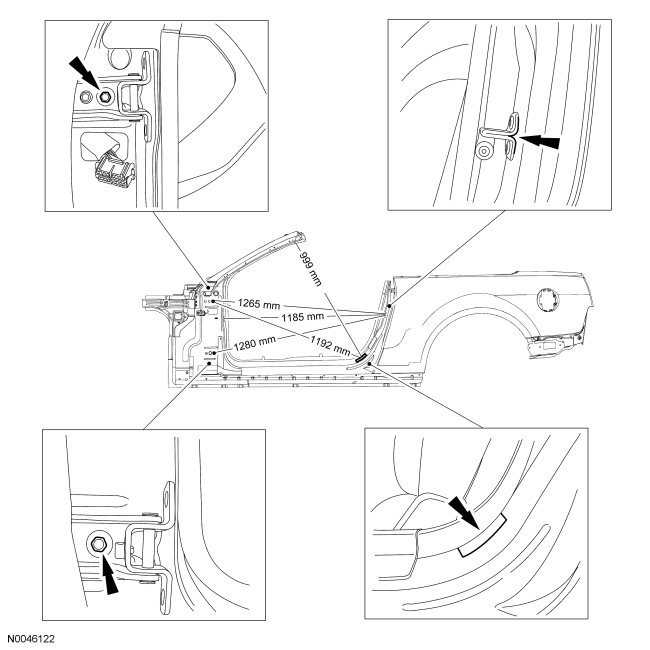
Body Side Closure Dimensions
Coupe
NOTE:
Measurements are obtained on center, unless otherwise indicated.

Convertible
NOTE:
Measurements are obtained on center, unless otherwise indicated.

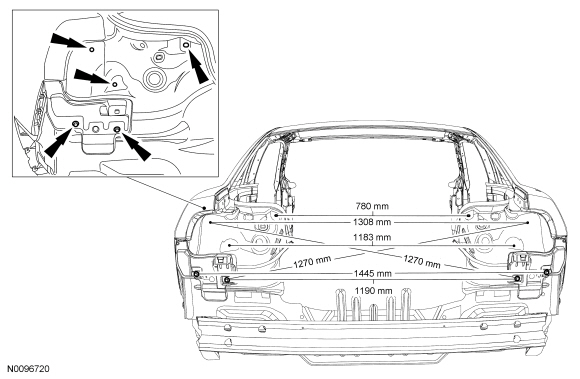
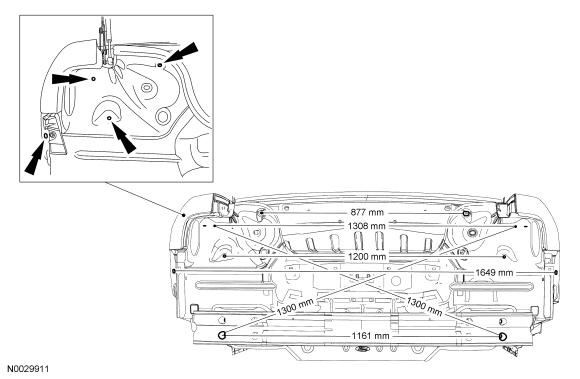
Rear Opening Dimensions
Coupe
NOTE:
Measurements are obtained on center, unless otherwise indicated.
NOTE:
Dimensions apply to coupe and convertible.

Convertible

Underbody Dimensions
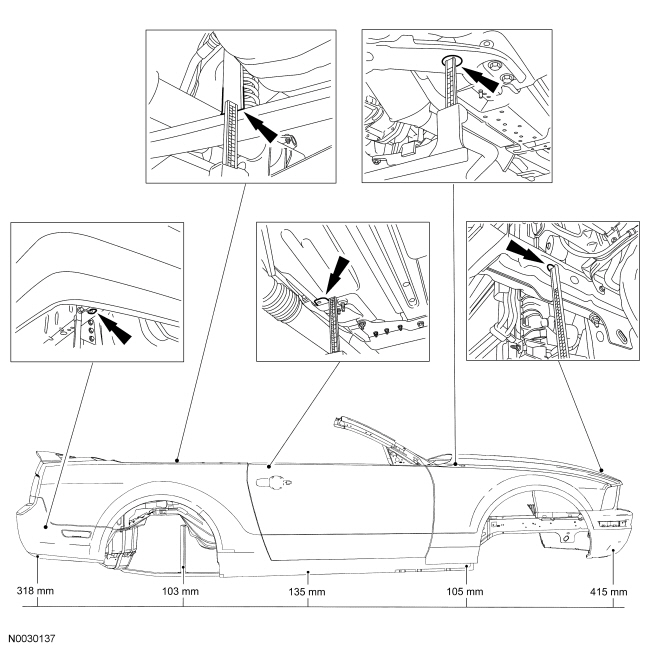
Frame Datum Height — Convertible
 WARNING: Frame rail crush zones absorb crash energy during a collision and must be replaced if damaged. Prior to replacement of frame rail crush zones, straighten damaged frame rails to correct frame dimensions. Failure to follow these instructions may adversely affect frame rail crush zone performance and may result in serious personal injury to vehicle occupants in a crash.
NOTE:
Datum height determined measuring from holes and slots on center, unless otherwise indicated.
NOTE:
Inset views indicated from left side of vehicle.

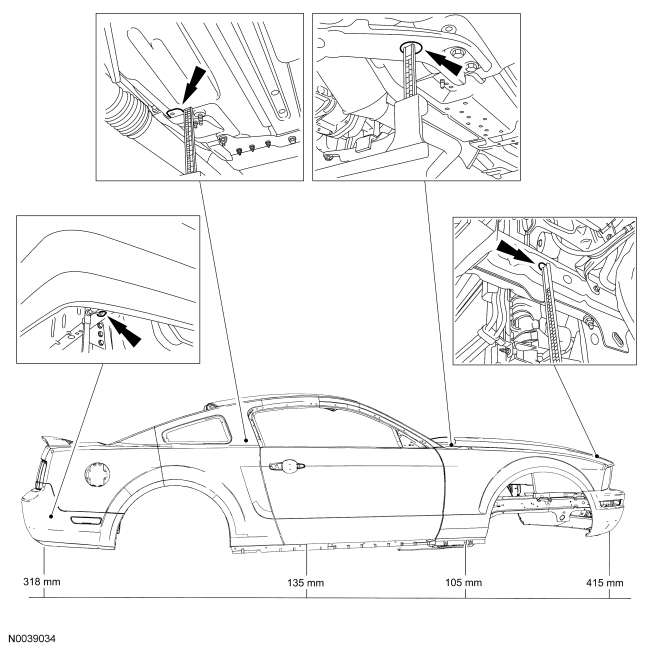
Frame Datum Height — Coupe
NOTE:
Datum height determined measuring from holes and slots on center, unless otherwise indicated.
NOTE:
Inset views indicated from left side of vehicle.

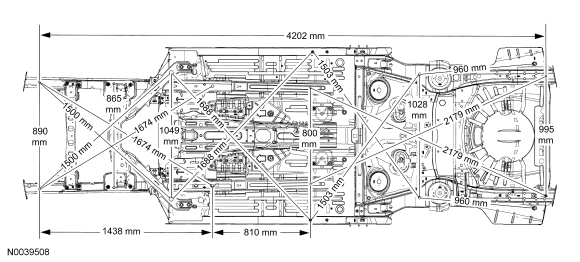
Underbody Dimensions
NOTE:
Measurements are obtained on center, unless otherwise indicated.
NOTE:
Coupe shown, convertible similar.

 WARNING: Collision damage repair must conform to the instructions contained in this workshop manual. Replacement components must be new, genuine Ford Motor Company parts. Recycled, salvaged, aftermarket or reconditioned parts (including body parts, wheels or safety restraint components) are not authorized by Ford.
