SECTION 501-35: Body Repairs
| 2014 Mustang Workshop Manual
|
REMOVAL AND INSTALLATION
| Procedure revision date: 01/07/2013
|
Roof Panel
General Equipment
| 3 Phase Inverter Spot Welder 254-00002
|
| Compuspot 700F Welder 190-50080
|
| I4 Inverter Spot Welder 254-00014
|
| Inverter Welder with MIG Welder 254-00015
|
Material
| Item
| Specification
|
|---|
Motorcraft® Seam Sealer
TA-2
| —
|
Roof Assembly — Coupe

| Item
| Part Number
| Description
| | 1
| 303410
| Windshield header panel — mild steel
|
| 2
| 50202
| Roof panel — mild steel
|
| 3
| 42220
| Rear window frame — High-Strength Low Alloy (HSLA) 350 steel
|
Removal
 WARNING: Invisible ultraviolet and infrared rays emitted in welding can injure unprotected eyes and skin. Always use protection such as a welder's helmet with dark-colored filter lenses of the correct density. Electric welding will produce intense radiation, therefore, filter plate lenses of the deepest shade providing adequate visibility are recommended. It is strongly recommended that persons working in the weld area wear flash safety goggles. Also wear protective clothing. Failure to follow these instructions may result in serious personal injury.
WARNING: Always wear protective equipment including eye protection with side shields, and a dust mask when sanding or grinding. Failure to follow these instructions may result in serious personal injury.
NOTICE:
Be sure to adequately protect all glass, exterior finish and interior trim to avoid damage during the repair procedure.
- Remove the windshield and rear window glass. For additional information, refer to
Section 501-11
.
- Remove the headliner. For additional information, refer to
Section 501-05
.
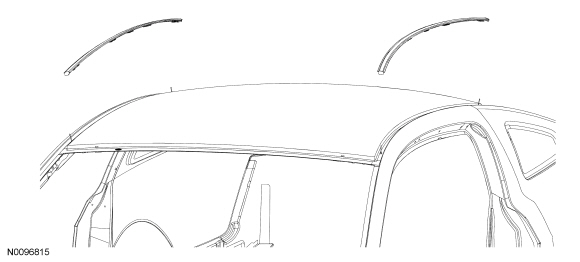
- Remove the roof ditch mouldings. For additional information, refer to
Section 501-08
.
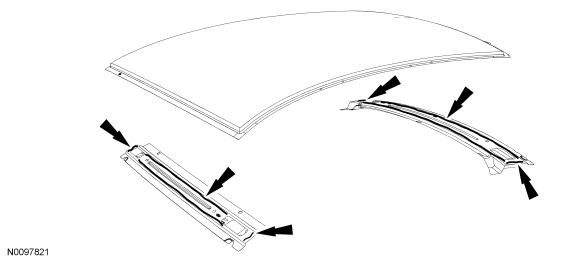
- From inside the vehicle, leaving as much of the foam as possible intact, separate the NVH foam along the windshield header and rear window frame panel from the roof panel, using a flexible and sharp broad scraper or knife.
- Remove (drill out) all the roof panel spot welds from the windshield header, roof side flanges and rear window glass openings.
- Using an air hammer equipped with a panel cutter bit, carefully separate the panel from the vehicle by cutting the entire length along the roof ditch seam on each side of the roof panel.
- With the help of an assistant, remove the roof panel from the vehicle.
- Using an air hammer equipped with a flat chisel, remove the remaining portion of the roof panel from the roof ditch area.
Installation
NOTICE:
Be sure to adequately protect all glass, exterior finish and interior trim to avoid damage during the repair procedure.
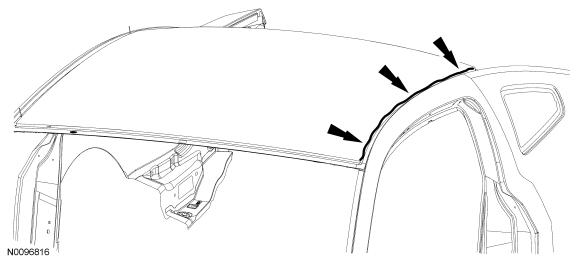
- Using a hammer and dolly, straighten any damage caused to the flange areas during removal.
- Using a grinder, carefully prepare the roof ditch area for the new roof panel.
- With the help of an assistant, position the new roof panel on the vehicle.
- Properly align and index-mark the positioning of the panel-to-vehicle and remove the panel.
- Apply flexible foam repair (locally obtained), on the roof bows and immediately reinstall the roof panel aligning it to the index marks made during the test fitting.
- Make sure good contact is made with foam and carefully clamp the roof panel on all sides.
NOTE:
Factory spot welds may be substituted with either resistance spot welds or Metal Inert Gas (MIG) plug welds. Spot/plug welds should equal factory welds in both location and quantity. Do not place a new spot weld directly over an original weld location. Plug weld hole should equal 8 mm (0.31 in) diameter.
Using a resistance spot welder or
welder, weld the roof panel to the vehicle along the windshield header, roof ditch flanges and rear window glass areas.
- Apply a quality primer-sealer following the paint manufacturer's recommendation for both compatibility and application.
- Apply seam sealer per manufacturer's label instructions between the body side outer and roof panel in the roof ditch seam on each side.
- Prepare the repair area for refinish material application, following the paint manufacturer's recommendations.
NOTE:
Always use refinishing materials from a single paint manufacturer. Combining products from more than one manufacturer may result in refinishing material incompatibility issues and potential void of warranty for each product applied.
If required, follow up with a quality primer-surfacer following the paint manufacturer's recommendations. Block sand to level using the recommended grit sandpaper.
- Refinish the roof and repair area following Ford-approved paint system recommendations.
- Allow refinishing materials sufficient cure time to permit safe handling (refer to paint manufacturer's specification) and install the roof ditch mouldings. For additional information, refer to
Section 501-08
.
- Install the headliner. For additional information, refer to
Section 501-05
.
- Install the windshield and rear window glass. For additional information, refer to
Section 501-11
.