SECTION 303-13: Evaporative Emissions
| 2014 Mustang Workshop Manual
|
REMOVAL AND INSTALLATION
| Procedure revision date: 01/07/2013
|
Evaporative Emission Canister
Removal
 WARNING: Do not smoke, carry lighted tobacco or have an open flame of any type when working on or near any fuel-related component. Highly flammable mixtures are always present and may be ignited. Failure to follow these instructions may result in serious personal injury.
WARNING: Do not carry personal electronic devices such as cell phones, pagers or audio equipment of any type when working on or near any fuel-related component. Highly flammable mixtures are always present and may be ignited. Failure to follow these instructions may result in serious personal injury.
WARNING: Always disconnect the battery ground cable at the battery when working on an evaporative emission (EVAP) system or fuel-related component. Highly flammable mixtures are always present and may be ignited. Failure to follow these instructions may result in serious personal injury.
All vehicles
- With the vehicle in NEUTRAL, position it on a hoist. For additional information, refer to
Section 100-02
.
- Disconnect the battery ground cable. For additional information, refer to
Section 414-01
.
Coupe vehicles
- Detach the fuel vapor tube retainer clip from the Evaporative Emission (EVAP) canister tray.
Convertible vehicles
- Detach the 2 fuel vapor tube retainer clips from the rear body.
- Detach the 2 fresh air hose retainer clips from the rear body.
All vehicles
NOTE:
Clean the
canister electrical connector and the immediate surrounding area of any dirt or foreign material.
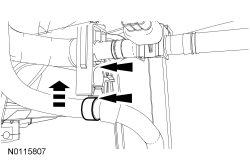
Disconnect the
canister electrical connector and detach the wiring harness retainer from the
canister tray.
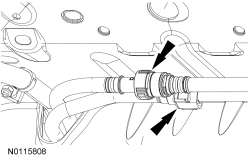
- Disconnect the 2 fuel vapor tube quick connect couplings from the
canister. For additional information, refer to
Section 310-00
.
- Detach the fresh air hose from the 2 retainer clips.
- Remove the 2
canister assembly bolts.
- Remove the 2 nuts and the
canister assembly.
NOTE:
New service
canister assemblies are equipped with tinnerman washers.
If the original
canister assembly will be reinstalled, remove and discard any damaged tinnerman washers from the
canister tray flange.
Installation
All vehicles
- If necessary, install new tinnerman washers onto the
canister tray flange.
- Install the
canister assembly and the 2 nuts.
- Tighten to 7 Nm (62 lb-in).
- Install the 2
canister assembly bolts.
- Tighten to 7 Nm (62 lb-in).
NOTICE:
The fresh air hose must be attached to the retainer clip at the colored band to provide the designed clearance between the fresh air hose and exhaust components. Failure to follow these instructions may damage the fresh air hose.
Align the colored band on the fresh air hose with the retainer clip and attach the hose.
- Attach the fresh air hose to the remaining retainer clip.
- Connect the 2 fuel vapor tube quick connect couplings to the
canister. For additional information, refer to
Section 310-00
.
- Connect the
canister electrical connector and attach the wiring harness retainer to the
canister tray.
Convertible vehicles
- Attach the 2 fresh air hose retainer clips to the rear body.
- Attach the 2 fuel vapor tube retainer clips to the rear body.
Coupe vehicles
- Attach the fuel vapor tube retainer clip to the
canister tray.
All vehicles
- Connect the battery ground cable. For additional information, refer to
Section 414-01
.
- Carry out the Evaporative Emission System Leak Test. For additional information, refer to
Evaporative Emission System Leak Test
in this section.