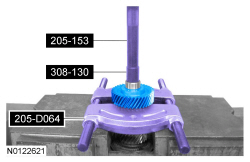
205-153 (T80T-4000-W)

308-130 (T87T-7025-DH)

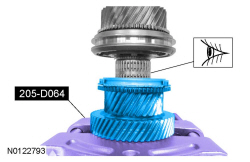
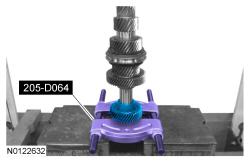
205-D064 (D84L-1123-A) or equivalent
SECTION 308-03A: Manual Transaxle/Transmission — MT82 Getrag 6-Speed
| 2014 Mustang Workshop Manual
|
DISASSEMBLY AND ASSEMBLY OF SUBASSEMBLIES
| Procedure revision date: 01/07/2013
|
| Handle
205-153 (T80T-4000-W) |
| Installer, Shift Rail Needle Bearing
308-130 (T87T-7025-DH) |
| Puller, Bearing
205-D064 (D84L-1123-A) or equivalent |
| Item | Specification |
|---|---|
| Motorcraft® Dual Clutch Transmission Fluid
XT-11-QDC | WSS-M2C200-D2 |
NOTE: Refer to the on-line Workshop Manual to learn about using an Interactive Illustration.
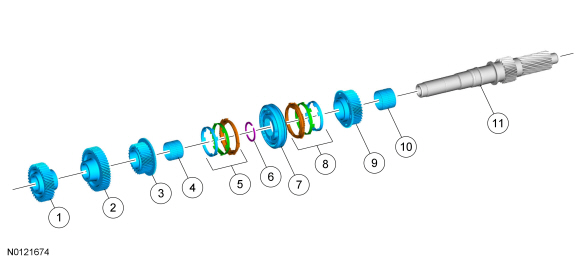
| Item | Part Number | Description |
|---|---|---|
| 1 | 7144 | 5th gear |
| 2 | 7146 | 6th gear |
| 3 | 7101 | 3rd gear |
| 4 | 7M037 | 3rd gear needle bearing |
| 5 | 7107 | 3rd gear synchronizer ring assembly |
| 6 | 7064 | 3rd/4th gear synchronizer assembly snap ring |
| 7 | 7124 | 3rd/4th gear synchronizer assembly |
| 8 | 7107 | 4th gear synchronizer ring assembly |
| 9 | 7112 | 4th gear |
| 10 | 7M037 | 4th gear needle bearing |
| 11 | 7113 | Countershaft |
Disassembly
NOTICE: Hand-tighten the Bearing Puller to prevent gear damage.
NOTICE: Support the countershaft while using the hydraulic press to prevent damage to the shaft or gears.
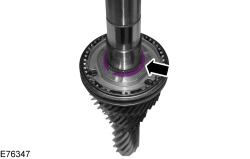
NOTE: Prior to removing the synchronizer rings, note the position of each synchronizer ring.
Remove the 3rd gear synchronizer ring assembly.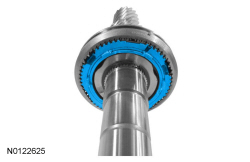
NOTE: Prior to removing the synchronizer rings, note the position of each synchronizer ring.
Remove the 4th gear from the 4th gear synchronizer ring assembly. Remove the 4th gear synchronizer ring assembly from the 3rd/4th gear synchronizer assembly.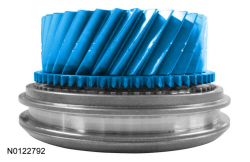
NOTICE: When removing the bearing, do not over expand the bearing cage or damage to the bearing cage can occur.
Remove the 4th gear needle bearing.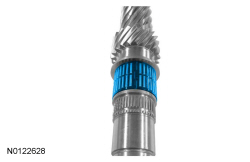
Assembly
NOTICE: Lubricate all components with the recommended transmission fluid before assembling.
NOTICE: When installing the bearing, do not over expand the bearing cage or damage to the bearing cage can occur.
Install the 4th gear needle bearing.NOTICE: The groove on the 3rd/4th gear synchronizer assembly must be facing away from 4th gear or damage to the synchronizer assembly can occur.
NOTICE: The 6 synchronizer ring tabs must engage into the 6 gear slots and the 3 synchronizer ring tabs must engage into the 3 synchronizer assembly slots or damage to the synchronizer assembly and synchronizer ring assembly can occur.
NOTE: The 4th gear synchronizer ring assembly outer ring has one identification notch.
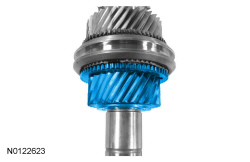
With the groove on the 3rd/4th gear synchronizer assembly sleeve facing away from 4th gear install the 4th gear synchronizer ring assembly and the 4th gear.
NOTICE: The 6 synchronizer ring tabs must engage into the 6 gear slots or damage to the synchronizer assembly and synchronizer ring assembly can occur.
NOTE: The 3rd gear synchronizer ring assembly outer ring has 2 identification notches.
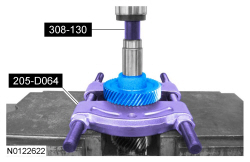
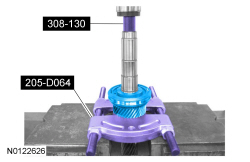
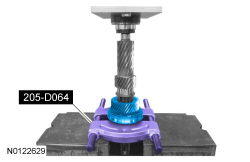
Position the 6th gear and the 3rd gear and the 3rd gear synchronizer ring assembly onto the Bearing Puller.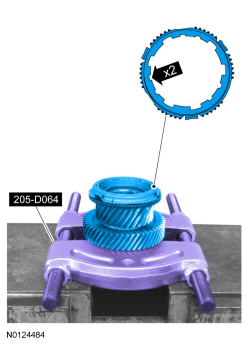
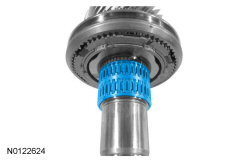
NOTE: Lubricate the needle bearing with petroleum jelly to hold it in place during assembly.
Install the 3rd gear needle bearing.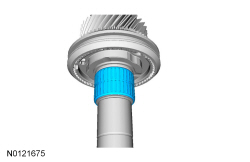
NOTICE: The 3 synchronizer ring tabs must engage into the 3 synchronizer assembly slots or damage to the synchronizer assembly and synchronizer ring assembly can occur.
NOTICE: Do not allow the 3rd gear needle bearing to slide down the countershaft while pressing the components or damage to the needle bearing can occur.
While keeping the 3rd gear needle bearing from sliding down the countershaft, use the Bearing Puller and a hydraulic press, install the 6th gear the 3rd gear and the 3rd gear synchronizer ring assembly.