
164-R3202 or equivalent

310-123
SECTION 310-01: Fuel Tank and Lines
| 2014 Mustang Workshop Manual
|
REMOVAL AND INSTALLATION
| Procedure revision date: 01/07/2013
|
| Fuel Storage Tanker
164-R3202 or equivalent |
| Fuel Tank Sender Unit Wrench
310-123 |
| Item | Part Number | Description |
|---|---|---|
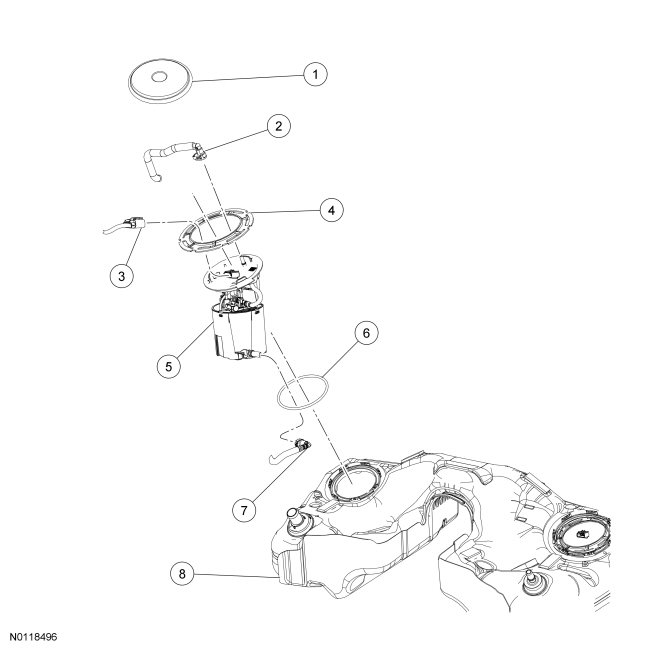
| 1 | 9C335 | Fuel Pump (FP) module access cover |
| 2 | — | Fuel tube-to- FP module quick connect coupling (part of 9J279) |
| 3 | 14A464 | FP module electrical connector |
| 4 | 9C385 | FP module lock ring |
| 5 | 9H307 | FP module |
| 6 | 9E275 | FP module O-ring seal |
| 7 | — | Internal fuel tube-to- FP module quick connect coupling (part of 9002) |
| 8 | 9002 | Fuel tank |
Removal and Installation
 WARNING: Do not smoke, carry lighted tobacco or have an open flame of any type when working on or near any fuel-related component. Highly flammable mixtures are always present and may be ignited. Failure to follow these instructions may result in serious personal injury.
WARNING: Do not carry personal electronic devices such as cell phones, pagers or audio equipment of any type when working on or near any fuel-related component. Highly flammable mixtures are always present and may be ignited. Failure to follow these instructions may result in serious personal injury.
WARNING: When handling fuel, always observe fuel handling precautions and be prepared in the event of fuel spillage. Spilled fuel may be ignited by hot vehicle components or other ignition sources. Failure to follow these instructions may result in serious personal injury.
WARNING: Before working on or disconnecting any of the fuel tubes or fuel system components, relieve the fuel system pressure to prevent accidental spraying of fuel. Fuel in the fuel system remains under high pressure, even when the engine is not running. Failure to follow this instruction may result in serious personal injury.
WARNING: Always disconnect the battery ground cable at the battery when working on an evaporative emission (EVAP) system or fuel-related component. Highly flammable mixtures are always present and may be ignited. Failure to follow these instructions may result in serious personal injury.
NOTE: The supplemental refueling adapter is located in the luggage compartment.
Install the supplemental refueling adapter and a length of semi-rigid fuel drain tube into the Easy Fuel TM (capless) fuel tank filler pipe until the tube enters the fuel tank.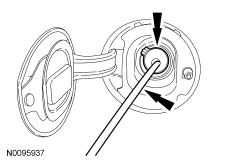
NOTE: This step will remove approximately one-eighth tank of fuel from a completely full fuel tank and the majority of any residual fuel from the fuel tank filler pipe. Also the fuel in the fuel tank will be below the Fuel Pump (FP) module mounting flange for FP module removal without fuel spillage.
Attach the Fuel Storage Tanker to the drain tube and remove one-eighth of the fuel (approximately 2 gallons) from a completely full tank, lowering the fuel below the FP module mounting flange.NOTE: Clean the FP module connections, couplings, flange surfaces and the immediate surrounding area of any dirt or foreign material.
Disconnect the FP module electrical connector.NOTE: Place absorbent pads in the general work area in case of fuel spillage.
Disconnect the rear fuel tube-to- FP module quick connect coupling. For additional information, refer to Section 310-00 .NOTE: Carefully install the Fuel Tank Sender Unit Socket to avoid damaging the FP module when removing the lock ring.
Using the Fuel Tank Sender Unit Socket, remove the FP module lock ring.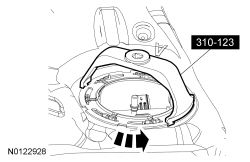
NOTICE: The Fuel Pump (FP) module must be handled carefully to avoid damage to the float arm.
Carefully lift the FP module out of the fuel tank allowing access and disconnect the internal fuel tube-to- FP module quick connect coupling. For additional information, refer to Section 310-00 .NOTE: Drain any residual fuel in the FP module into a suitable container.
Completely remove the FP module from the fuel tank.NOTE: Inspect the surfaces of the FP module flange and fuel tank O-ring seal contact surfaces. Do not polish or adjust the O-ring seal contact area of the fuel tank flange or the fuel tank. Install a new FP module or fuel tank if the O-ring seal contact area is bent, scratched or corroded.
Remove and discard the FP module O-ring seal.NOTE: Make sure to install a new FP module O-ring seal.
NOTE: Make sure the alignment tabs on the FP module and the slots on the fuel tank meet before tightening the FP module lock ring.
To install, reverse the removal procedure.