
100-002 or equivalent
SECTION 412-00: Climate Control System — General Information and Diagnostics
| 2014 Mustang Workshop Manual
|
GENERAL PROCEDURES
| Procedure revision date: 01/07/2013
|
| Dial Indicator Gauge With Holding Fixture
100-002 or equivalent |
3.7L and 5.0L vehicles

5.4L (4V) vehicles
NOTE: If carrying out the clutch air gap measurement with the A/C compressor removed from the vehicle, the Dial Indicator Gauge with Holding Fixture can be installed using the lower front A/C compressor bolt and a suitable nut.
Using the A/C compressor bolt, attach the Dial Indicator Gauge with Holding Fixture to the bottom front compressor mounting boss with the gauge pin contacting the hub portion of the A/C clutch disc and hub and partially depressed.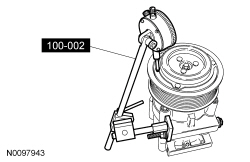
NOTE: To make sure of correct polarity, only attach the 12V power supply positive lead to the positive side of the electrical connector and the negative lead to the negative side.
Using 2 fused jumper wires, engage the compressor clutch by connecting the A/C clutch field coil to the power and ground from a 12V power supply.NOTE: When the 12V power supply is disconnected from the A/C clutch field coil, the clutch air gap measurement will be displayed on the runout gauge.
Record the clutch air gap measurement shown on the runout gauge.All vehicles