SECTION 501-12: Instrument Panel and Console
2014 Mustang Workshop Manual
REMOVAL AND INSTALLATION
Procedure revision date: 01/07/2013

Instrument Panel

Removal and Installation

All vehicles

  1. Remove the floor console. For additional information, refer to Console — Floor in this section.

Vehicles with automatic transmission

  1. Remove the selector lever. For additional information, refer to Section 307-05 .

All vehicles

  1. Remove the 2 door scuff plates. For additional information, refer to Interior Trim — Exploded View in Section 501-05 .
  1. Remove the 2 A-pillar lower trim panels. For additional information, refer to Interior Trim — Exploded View in Section 501-05 .
  1. Remove the 2 A-pillar trim panels. For additional information, refer to Section 501-05 .
  1. Remove the steering wheel. For additional information, refer to Section 211-04 .
  1. Remove the instrument cluster. For additional information, refer to Section 413-01 .
  1. NOTICE: Do not allow the steering column to rotate while the steering column shaft is disconnected or damage to the clockspring may result. If there is evidence that the steering column shaft has rotated, the clockspring must be removed and recentered. For additional information, refer to Section 501-20B .

    Remove and discard the steering column shaft bolt. Separate the steering column shaft from the steering column.
  1. Disconnect the 2 instrument panel electrical connectors at the LH lower cowl. If equipped, disconnect the LH audio amplifier.
  1. On the LH side, remove the instrument panel side support bolt.
  1. If equipped, remove the RH lower instrument panel insulator.
  1. On the RH side, disconnect the 2 electrical connectors at the Smart Junction Box (SJB).
  1. Disconnect the bulkhead electrical connector, near the RH lower side of the SJB .
  1. Disconnect the blower motor in-line electrical connector and antenna in-line connector. If equipped, disconnect the satellite radio antenna in-line connector.
  1. Remove the 2 instrument panel center support screws.
  1. Remove the 3 instrument panel center support bolts.
  1. Through the instrument cluster opening, loosen the instrument panel cowl top bracket nut.
  1. Remove the 2 instrument panel lower support bolts.
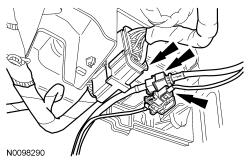
  1. NOTICE: When prying on a component, a non-marring tool must be used or damage to the component may occur.

    Remove the 2 instrument panel side finish panels.
  1. Remove the 4 instrument panel upper support bolts.
  1. Disconnect the Restraints Control Module (RCM) small connector.
  1. NOTICE: To avoid damaging the instrument panel, the aid of an assistant is required to carry out this step.

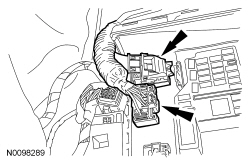
    NOTICE: Make sure that all electrical connectors and wiring are not hindered before removing the instrument panel or damage to the components may occur.

    Remove the instrument panel.
  1. NOTICE: To avoid damaging the instrument panel, the aid of an assistant is required when positioning the instrument panel to the vehicle.

    NOTICE: Make sure that all electrical connectors and wiring are correctly routed when installing the instrument panel or damage to the components may occur.

    To install, reverse the removal procedure.