SECTION 501-18: Convertible Top
| 2014 Mustang Workshop Manual
|
REMOVAL AND INSTALLATION
| Procedure revision date: 01/07/2013
|
Convertible Top Material
Removal
NOTICE:
Use care when working around or handling the convertible top material to avoid scratching or creasing the material.
NOTICE:
Use care when handling the convertible top material to avoid damaging the rear glass. If damaged or broken, the rear glass cannot be replaced, and will require replacement of the convertible top material.
NOTE:
Light scratches in the convertible top material can be removed using isopropyl alcohol and 600-grit sandpaper or steel wool. Use light pressure, polishing in a circular motion. Use care not to use excessive pressure. Do not use power tools, as these permanently damage the convertible top material. Heavy scratches require replacement of the convertible top material.
NOTE:
Light creases in the convertible top material can be removed by applying water to the creased area, and pulling the creased area flat, while applying mild heat from a heat gun. Use care not to apply excessive heat, as this permanently damages the convertible top material. Heavy creases may require replacement of the convertible top material.
NOTE:
Removal:
 Click here to view a video version of this procedure.
Installation:
Click here to view a video version of this procedure.
- Remove the convertible top assembly. For additional information, refer to
Convertible Top Assembly
in this section.
- Place the convertible top assembly on a flat surface and open fully.
NOTE:
These bolts were removed during convertible top assembly removal.
Install the LH and RH convertible top frame number 5 bow pivot bolts.
- If installing the original convertible top material, use chalk or china marker to mark, on the convertible top material, the position of the top and bottom edge of the convertible top frame number 5 bow.
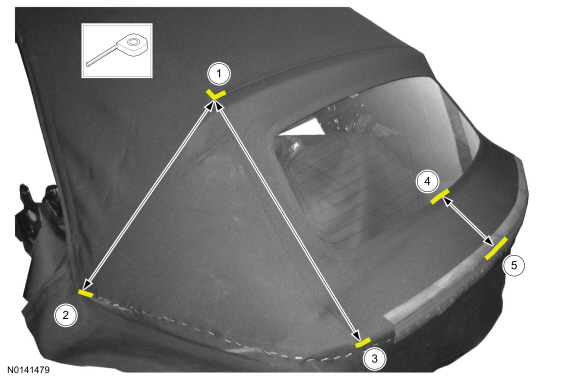
- If installing a new convertible top material, measure and record on both sides, the following distances:
- between 1 (upper corner seam) and 2 (top of number 5 bow).
- between 1 (upper corner seam) and 3 (top of number 5 bow).
- between 4 (bottom of rear window glass) and 5 (top of number 5 bow).
NOTICE:
Be sure to mark the location of the weatherstrip retaining channels prior to removal. If the weatherstrip retaining channels are not replaced in their original locations, the weatherstrips may not seal properly, resulting in water leaks and interior damage. Failure to replace the retaining channels correctly may require replacement of the convertible top assembly.
Mark the location and remove the 3 LH and RH side weatherstrips, screws and the retainer channels.
NOTE:
The screws will be reused during installation.
Remove the 11 screws and the compression panel.
- Remove the staples which secure the LH and RH front corners of the convertible top material to the frame.
- Release the front retaining track securing the front of the convertible top material from the front underside of the convertible top frame number 1 bow.
- Remove the rivets attaching the front corners of the convertible top material (2 per side) to the convertible top frame number 1 bow.
- Pull the convertible top material from the header form panel.
- Remove the 6 screws and the header form panel.
- Use an awl or punch to remove mandrel from hole from the number 1 bow (rivets previously removed in step 10).
- Release the rear retaining tracks from rear top side of number 1 bow.
- If equipped, remove staples and the weatherstrip from the number 5 bow.
- Remove the staples attaching the convertible top material to the convertible top frame number 5 bow.
- Disconnect the heated rear window electrical connectors from the rear window glass.
- Remove forward cable guide rivet, after rivet removal use an awl or punch to remove mandrel from hole prior to assembly.
NOTE:
There are 2 types of screws used. Note the location of screws for installation. The screws will be reused during installation.
NOTE:
There will be 6 screws for early build convertible top.
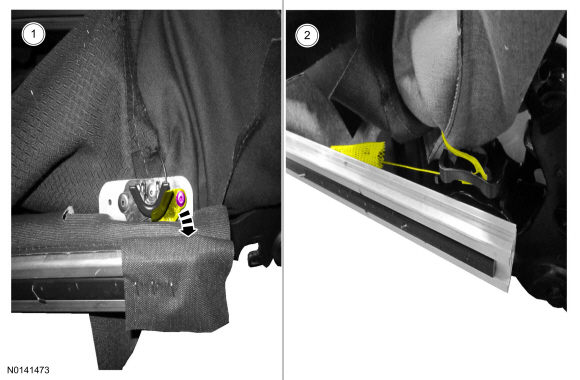
Remove the 4 screws holding the front of the LH and RH stay pads.
NOTE:
The screws will be reused during installation.
Remove the convertible top cover cross vehicle elastic retaining straps (one on each side) from the front side rails most forward attachment.
NOTE:
The washer and screw will be reused during installation.
Remove the convertible top cover short elastic retaining straps (one on each side) from the front side rails rearward attachment.
- Position the water diverters aside to gain access to the tension cables.
NOTE:
Depending on the build level of the convertible top, the tension cable rivet attachment will be on the inside of the number 5 bow or on the top of the number 5 bow.
Remove tension cable spring rivet attachment from the number 5 bow. Drill out rivet completely.
NOTE:
Depending on the build level of the convertible top, there will be either tension cable guide or no guide. See the illustration to determine if you have a guide and which guide is used.
If equipped with a tension cable guide, remove the tension cable from the tension cable guide.
- Remove the tension guide rivet and pivot the guide retainer down to remove the cable. After rivet removal, use an awl or punch to remove mandrel from hole prior to assembly.
- Route the tension cable out from the tension guide.
- Remove water diverter push pins (one each side).
- Disconnect the Velcro® strap securing the water diverters around the hinge assembly.
- Remove the 2 pin-type retainers securing the top material to the top frame side rail.
- By pulling staples, remove water diverter elastic retaining straps from number 5 bow.
- Pull tension cable through pocket toward front of top.
NOTE:
The screws will be reused during installation.
Remove retaining strap at rear of side rail by removing shouldered screw (one per side).
NOTE:
The screws will be reused during installation.
Remove the retaining strap screws (2 on each side).
- Fold convertible top material over to number 2 and 3 bows and slide convertible top material to the RH or LH side off the number 2 and 3 bow extrusions.
Installation
- Place the convertible top material on the convertible top frame.
- Mark the headliner using chalk at the center hole in the number 2 bow (if no mark is present).
- Align the convertible top material using the mark made on the headliner to the mark on the convertible top material. Snap the convertible top channels into the guides on the convertible top frame number 2 bow.
- Center the convertible top material on the number 3 bow and snap the convertible top channels into the guides.
- Using heavy wire or other suitable material, pull the convertible top tensioner cables through the channels to the rear of the convertible top.
- Connect the heated rear window electrical connectors.
- Reattach the retaining strap to rear of side rail using shouldered screw (one per side).
NOTE:
Depending on the build level of the convertible top, there will be either tension cable guide or no guide. See the illustration to determine if you have a guide and which guide is used.
If equipped with a tension cable guide, route the tension cable through the guide.
- Route the tension cable through the tension guide bracket and pivot the bracket up. Install rivet (one per side, W707504-S303) in the pivot guide bracket.
- Route the tension cable through the tension guide bracket.
NOTE:
Depending on the build level of the convertible top, the tension cable rivet attachment will be on the inside of the number 5 bow or on the top of the number 5 bow.
Install the tension cable to the number 5 bow.
- If equipped with a guide bracket, place spring silencer over spring and rivet spring attachment to the number 5 bow using a rivet (one per side, W707504-S303).
- If not equipped with a guide bracket, rivet spring attachment to the number 5 bow using a rivet (one per side, W525155-S303).
- Reattach water diverter elastic strap to number 5 bow, (route inboard of tension cable at front and under stay pads and locate just inboard of stay pads and secure with two 3/8 inch T-50 stainless steel staples to number 5 bow.
- Tuck water diverter behind rear rail form panel and loosely wrap Velcro® strap around rear rail to engage.
NOTE:
Drive screw 15 mm (5/8 inch) from end of strap into hole in side rail.
Attach the convertible top cover cross vehicle elastic retaining straps (one on each side) to the front side rails most forward attachment.
NOTICE:
Use hand tools to install the screws. Failure to use hand tools will damage the threads in the convertible top.
NOTE:
There will be 6 screws for early build convertible tops.
Install the 4 screws holding the front of the LH and RH stay pads.
NOTE:
Reuse loose washer and screw (one each side), drive screw 15 mm (5/8 inch) from end of strap into hole in side rail
Attach the convertible top cover short elastic retaining straps (one on each side) to the front side rails rearward attachment.
- Center the convertible top material on the number 1 bow then snap the front retaining track of the top cover onto the number 1 bow.
NOTE:
Center rear screw is shorter than the other 5, and must be routed through fabric tab underneath support panel.
Install the header form panel and 6 screws.
- Rivet the front tension cable attachment using a rivet (one per side, W707504-S303).
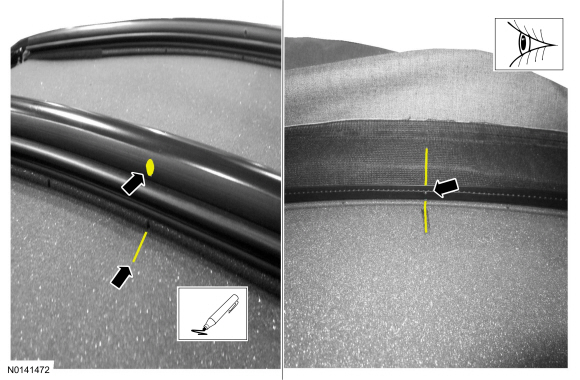
- Apply a light mist of water to the double-sided tape on the header form panel, and the underside of the convertible top material where it will contact the tape.
- Install the rivets (W707504-S303) attaching the front corners of the convertible top material to the frame number 1 bow (2 each side).
- Install the front retaining channel into place on the front underside of the convertible top frame number 1 bow, starting in the center and working out towards the edges. Using a spring clamp, clamp the convertible top material in place.
- Prior to stapling, make sure there are no wrinkles in the convertible top material along the front edge. Staple (1/4 inch T-50 stainless steel) the front corners of the convertible top material to the frame.
- Starting with the center screw, then 2 end screws and working inward, install the compression panel and 11 screws.
- Tighten to 2 Nm (18 lb-in).
NOTE:
Across the center of the number 5 bow there are two thicknesses of material to be wrapped over the number 5 bow and evenly pulled during stapling.
Using an assistant, pull the convertible top material rearward over the convertible top frame number 5 bow using the measurements recorded from the original top or, if installing the original top, the marks made during removal.
NOTE:
Make sure there are no wrinkles on the top of the convertible top material.
Staple (3/8 inch T-50 stainless steel) the convertible top material to the convertible top frame number 5 bow, starting at the centerline rear then the remaining measurement points. Fill in between all the spaces between leaving a 25.4 mm (1 in) to 50.8 mm (2 in) gap between staples.
- If installing a new convertible top material, remove extra material from the convertible top leaving 25.4 mm (1 in) to 38.1 mm (1.5 in) below the number 5 bow.
- If equipped, install number 5 bow weatherstrip using 3/8 inch T50 stainless steel staples leaving a 25.4 mm (1 in) to 50.8 mm (2 in) gap between staples. Staple the center, then the 2 ends and fill in the areas between.
- Secure the sliding poly retainer channels with retaining pins (one per side) securing the material to the top frame side rail.
- Install the large push pins securing the water diverters to the hinge.
NOTICE:
Make sure the weatherstrip retaining channels are replaced in their original locations. Failure to replace the retaining channels in their correct positions may cause water leaks, resulting in interior damage.
Install the LH and RH side front, center and rear weatherstrip retainer channels and screws.
- Front retainer channel, tighten to 3 Nm (27 lb-in).
- Center and rear retainer channel, tighten to 5 Nm (44 lb-in).
- Install the left and right side front, middle and rear weatherstrip.
- Remove the LH and RH convertible top frame No. 5 bow pivot bolts.
- Install the convertible top assembly. For additional information, refer to
Convertible Top Assembly
in this section.