205-153 (T80T-4000-W)

303-1250

303-519 (T95P-6701-EH)

100-001 (T50T-100-A)
SECTION 303-01B: Engine — 5.0L (4V)
| 2014 Mustang Workshop Manual
|
IN-VEHICLE REPAIR
| Procedure revision date: 01/07/2013
|
| Handle
205-153 (T80T-4000-W) |
| Installer, Rear Main Seal
303-1250 |
| Remover, Crankshaft Rear Oil Seal
303-519 (T95P-6701-EH) |
| Slide Hammer
100-001 (T50T-100-A) |
| Item | Specification |
|---|---|
| Motorcraft® Metal Surface Prep
ZC-31-A | — |
| Motorcraft® SAE 5W-20 Premium Synthetic Blend Motor Oil (US); Motorcraft® SAE 5W-20 Super Premium Motor Oil (Canada)
XO-5W20-QSP (US); CXO-5W20-LSP12 (Canada) | WSS-M2C945-A |
| Motorcraft® Silicone Gasket Remover
ZC-30 | — |
| Motorcraft® Silicone Gasket and Sealant
TA-30 | WSE-M4G323-A4 |
Removal
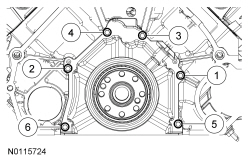
NOTE: Inspect the crankshaft sensor ring for damage. If the crankshaft sensor ring has been dropped or has any visual damage, it must be discarded.
Remove the crankshaft sensor ring.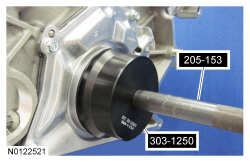
Installation
NOTICE: Do not use metal scrapers, wire brushes, power abrasive discs or other abrasive means to clean the sealing surfaces. These tools cause scratches and gouges which make leak paths. Use a plastic scraping tool to remove all traces of old sealant.
NOTE: Clean the sealing surfaces with silicone gasket remover and metal surface prep. Follow the directions on the packaging.
Clean and inspect the mating surface.NOTE: If the rear crankshaft seal retaining plate is not secured within 4 minutes, the sealant must be removed and the sealing area cleaned with silicone gasket remover and metal surface prep. Follow the directions on the packaging. Allow to dry until there is no sign of wetness, or 5 minutes, whichever is longer. Failure to follow this procedure may cause future oil leaks.
Apply a 3.75 mm (0.147 in) bead of silicone gasket and sealant to the rear crankshaft seal retainer mating surface on the engine block.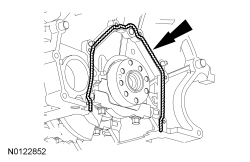
NOTE: Lubricate the seal lips and bore with clean engine oil prior to installation.
Position the Rear Main Seal Installer onto the end of the crankshaft and slide a new crankshaft rear seal onto the tool.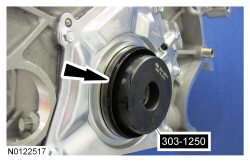
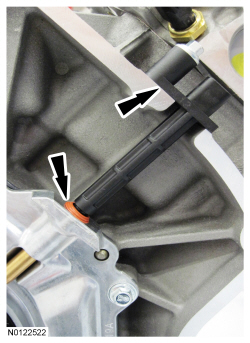
NOTICE: The Crankshaft Position (CKP) sensor must be positioned into the fitting on the crankshaft rear seal retainer plate and be flush against the boss on the engine block before the bolt is installed. If the CKP sensor is installed incorrectly, the CKP sensor can be damaged.
Position the CKP sensor and install the bolt.