SECTION 303-01B: Engine — 5.0L (4V)
| 2014 Mustang Workshop Manual
|
IN-VEHICLE REPAIR
| Procedure revision date: 01/07/2013
|
Oil Pump
Special Tool(s)
 | Holding Tool, Crankshaft
303-448 (T93P-6303-A)
|
Removal
NOTICE:
During engine repair procedures, cleanliness is extremely important. Any foreign material, including any material created while cleaning gasket surfaces, that enters the oil passages, coolant passages or the oil pan, can cause engine failure.
- With the vehicle in NEUTRAL, position it on a hoist. For additional information, refer to
Section 100-02
.
- Remove the engine front cover. For additional information, refer to
Engine Front Cover
in this section.
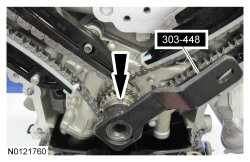
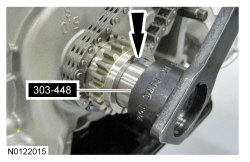
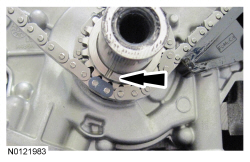
- Using the crankshaft holding tool, rotate the crankshaft clockwise until the keyway is at the 12 o'clock position.
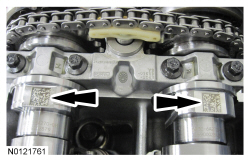
- Verify the data matrix on the camshafts is facing up, if not, rotate the crankshaft clockwise one revolution.
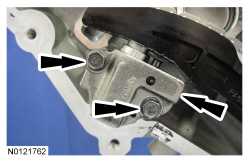
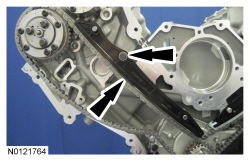
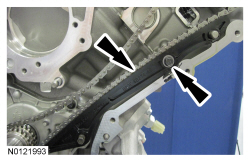
- Remove the 2 bolts and the RH primary timing chain tensioner.
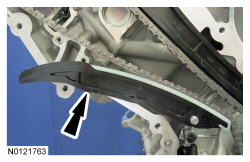
NOTE:
It may be necessary to rotate the crankshaft slightly to provide enough slack in the chain to remove the RH timing chain tensioner arm. Return the crankshaft keyway to the 12 o'clock position after removing the RH timing chain tensioner arm.
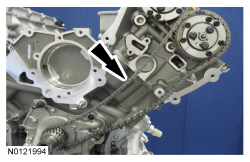
Remove the RH timing chain tensioner arm.
NOTE:
It may be necessary to rotate the crankshaft slightly to provide enough slack in the chain to remove the RH timing chain guide. Return the crankshaft keyway to the 12 o'clock position after removing the RH timing chain guide.
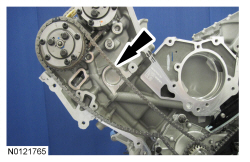
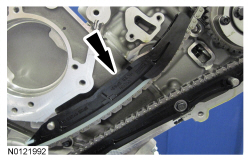
Remove the bolt and the RH timing chain guide.
- Remove the RH primary timing chain.
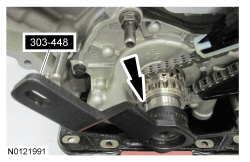
- Using the crankshaft holding tool, rotate the crankshaft counterclockwise until the crankshaft keyway is at the 9 o'clock position.
- Remove the 2 bolts and the LH primary timing chain tensioner.
NOTE:
It may be necessary to rotate the crankshaft slightly to provide enough slack in the chain to remove the LH timing chain tensioner arm. Return the crankshaft keyway to the 9 o'clock position after removing the LH timing chain tensioner arm.
Remove the LH timing chain tensioner arm.
NOTE:
It may be necessary to rotate the crankshaft slightly to provide enough slack in the chain to remove the LH timing chain guide. Return the crankshaft keyway to the 9 o'clock position after removing the LH timing chain guide.
Remove the bolt and the LH timing chain guide.
- Remove the LH primary timing chain.
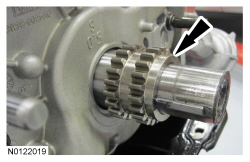
- Remove the crankshaft sprocket.
- Remove the oil pan. For additional information, refer to
Engine Lubrication Components — Exploded View
and
Oil Pan
in this section.
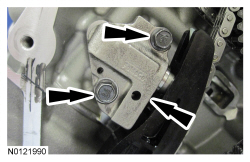
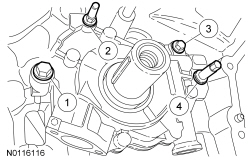
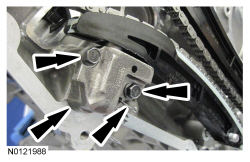
- Remove the 2 bolts, the 2 stud bolts and the oil pump.
Installation
- Rotate the inner rotor of the oil pump assembly to align the flats on the crankshaft and slip the oil pump over the crankshaft until seated against the block.
- Rotate the oil pump until the bolt holes are aligned to the block and install the fasteners.
NOTE:
Oil pump must be held against the cylinder block until all bolts are tightened.
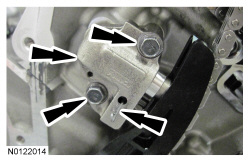
Tighten the fasteners in the sequence shown in 3 stages:
- Stage 2: Tighten the bolt (1) to 10 Nm (89 lb-in), the stud bolt (2) to 25 Nm (18 lb-ft), the bolt (3) to 10 Nm (89 lb-in) and the stud bolt (4) to 20 Nm (177 lb-in).
- Stage 3: Tighten the bolt (1) an additional 45 degrees, the stud bolt (2) an additional 75 degrees, the bolt (3) an additional 45 degrees and the stud bolt (4) an additional 60 degrees.
- Install the oil pan. For additional information, refer to
Engine Lubrication Components — Exploded View
and
Oil Pan
in this section.
- Install the crankshaft sprocket with the flange facing forward.
- Install the LH primary timing chain.
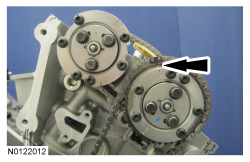
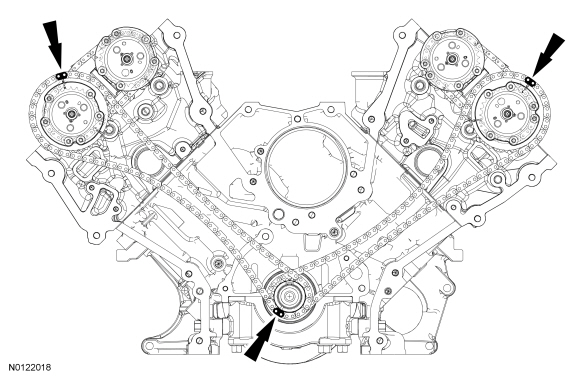
- Align the colored link on the timing chain with the timing mark on the LH
assembly.
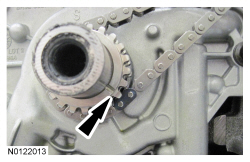
- Align the remaining colored link on the timing chain with the timing mark on the crankshaft sprocket.
NOTE:
It may be necessary to rotate the crankshaft slightly to provide enough slack in the chain to install the LH timing chain guide. Return the crankshaft keyway to the 9 o'clock position after installing the LH timing chain guide.
Install the LH timing chain guide and bolt.
- Tighten to 10 Nm (89 lb-in).
NOTE:
It may be necessary to rotate the crankshaft slightly to provide enough slack in the chain to install the LH timing chain tensioner arm. Return the crankshaft keyway to the 9 o'clock position after installing the LH timing chain tensioner arm.
Install the LH timing chain tensioner arm.
NOTE:
Complete the following 3 steps on both the LH and RH primary timing chain tensioners.
NOTICE:
Do not compress the ratchet assembly or damage to the tensioner will occur.
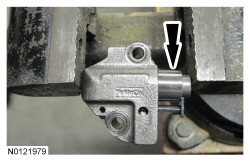
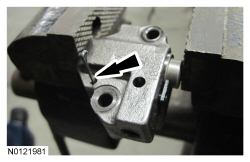
Compress the primary timing chain tensioner plunger, using an edge of a vise.
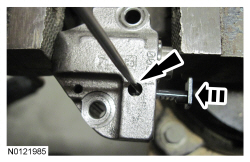
- Using a small screwdriver or pick, push back and hold the ratchet mechanism, then push the ratchet arm back into the tensioner housing.
- Install a suitable pin into the hole of the tensioner housing to hold the ratchet assembly and plunger in place during installation.
- Install the LH primary timing chain tensioner and 2 bolts.
- Tighten to 10 Nm (89 lb-in).
- Remove the holding pin from the tensioner.
- Using the crankshaft holding tool, rotate the crankshaft clockwise until the crankshaft keyway is at the 12 o'clock position.
- Install the RH primary timing chain.
- Align the colored link on the timing chain with the timing mark on the RH
assembly.
- Align the remaining colored link on the timing chain with the timing mark on the crankshaft sprocket.
NOTE:
It may be necessary to rotate the crankshaft slightly to provide enough slack in the chain to install the RH timing chain guide. Return the crankshaft keyway to the 12 o'clock position after installing the RH timing chain guide.
Install the RH timing chain guide and bolt.
- Tighten to 10 Nm (89 lb-in).
NOTE:
It may be necessary to rotate the crankshaft slightly to provide enough slack in the chain to install the RH timing chain tensioner arm. Return the crankshaft keyway to the 12 o'clock position after installing the RH timing chain tensioner arm.
Install the RH timing chain tensioner arm.
- Install the RH primary timing chain tensioner and 2 bolts.
- Tighten to 10 Nm (89 lb-in).
- Remove the holding pin from the tensioner.
- With the crankshaft keyway still at the 12 o'clock position, verify the timing mark alignment is correct.
- Install the engine front cover. For additional information, refer to
Engine Front Cover
in this section.