
105-R025D or equivalent

FLU77-4 or equivalent

SECTION 204-05: Vehicle Dynamic Suspension
| 2014 Mustang Workshop Manual
|
DIAGNOSIS AND TESTING
| Procedure revision date: 04/19/2013
|
 | Flex Probe Kit
105-R025D or equivalent |
 | Fluke 77-IV Digital Multimeter
FLU77-4 or equivalent |
 | Vehicle Communication Module (VCM) and Integrated Diagnostic System (IDS) software with appropriate hardware, or equivalent scan tool
|
DTC and Symptom Charts
DTC Chart
Diagnostics in this manual assume a certain skill level and knowledge of Ford-specific diagnostic practices. Refer to Diagnostic Methods in Section 100-00 for information about these practices.
VDM DTC Chart
| DTCs | Description | Action |
|---|---|---|
| C110C:11 | Left Front Damper Solenoid: Circuit Shorted to Ground | GO to Pinpoint Test D . |
| C110C:12 | Left Front Damper Solenoid: Circuit Shorted to Battery | GO to Pinpoint Test D . |
| C110C:13 | Left Front Damper Solenoid: Circuit Open | GO to Pinpoint Test D . |
| C110D:11 | Right Front Damper Solenoid: Circuit Shorted to Ground | GO to Pinpoint Test D . |
| C110D:12 | Right Front Damper Solenoid: Circuit Shorted to Battery | GO to Pinpoint Test D . |
| C110D:13 | Right Front Damper Solenoid: Circuit Open | GO to Pinpoint Test D . |
| C110E:11 | Left Rear Damper Solenoid: Circuit Shorted to Ground | GO to Pinpoint Test D . |
| C110E:12 | Left Rear Damper Solenoid: Circuit Shorted to Battery | GO to Pinpoint Test D . |
| C110E:13 | Left Rear Damper Solenoid: Circuit Open | GO to Pinpoint Test D . |
| C110F:11 | Right Rear Damper Solenoid: Circuit Shorted to Ground | GO to Pinpoint Test D . |
| C110F:12 | Right Rear Damper Solenoid: Circuit Shorted to Battery | GO to Pinpoint Test D . |
| C110F:13 | Right Rear Damper Solenoid: Circuit Open | GO to Pinpoint Test D . |
| U0001:88 | High Speed CAN Communications Bus: Bus Off | REFER to Section 418-00 to diagnose the no communication concern. |
| U0100:87 | Lost Communication with ECM /PCM A: Missing Message | GO to Pinpoint Test E . |
| U0121:87 | Lost Communication with ABS Control Module: Missing Message | GO to Pinpoint Test F . |
| U0155:87 | Lost Communication with IPC : Missing Message | GO to Pinpoint Test G . |
| U0401:00 | Invalid Data Received from ECM /PCM A: No Sub Type Information | This DTC sets when the VDM module receives invalid network data from the PCM. RETRIEVE and REPAIR all non-network DTCs in the PCM. REFER to Section 303-14 . |
| U0415:00 | Invalid Data Received from ABS Control Module: No Sub Type Information | This DTC sets when the VDM module receives invalid network data from the ABS module. RETRIEVE and REPAIR all non-network DTCs in the ABS module. REFER to Section 206-09 . |
| U0423:00 | Invalid Data Received from IPC : No Sub Type Information | This DTC sets when the VDM module receives invalid network data from the IPC . RETRIEVE and REPAIR all non-network DTCs in the IPC . REFER to Section 413-01 . |
| U2100:00 | Initial Configuration Not Complete: No Sub Type Information | CHECK the service history for recent service actions related to the
VDM
module. This DTC sets due to incomplete or improper module configuration.
If there have been recent service actions with this module, REPEAT the PMI using as-built data. If there have been no recent service actions INSTALL a new VDM module. REFER to Vehicle Dynamics Module (VDM) in this section. |
| U3000:04 | Control Module: System Internal Failure | CLEAR the DTC. CARRY OUT the
VDM
module self-test. RETRIEVE and RECORD all DTCs.
If the DTC returns, INSTALL a new VDM module. REFER to Vehicle Dynamics Module (VDM) . |
| U3003:16 | Battery Voltage: Circuit Voltage Below Threshold | GO to Pinpoint Test A . |
| U3003:17 | Battery Voltage: Circuit Voltage Above Threshold | GO to Pinpoint Test B . |
Symptom Chart
Diagnostics in this manual assume a certain skill level and knowledge of Ford-specific diagnostic practices. Refer to Diagnostic Methods in Section 100-00 for information about these practices.
| Condition | Possible Sources | Action |
|---|---|---|
|
|
|
|
|
|
|
|
|
|
|
Diagnostic Routines
Pinpoint Test A: U3003:16
Diagnostics in this manual assume a certain skill level and knowledge of Ford-specific diagnostic practices. Refer to Diagnostic Methods in Section 100-00 for information about these practices.
Refer to Wiring Diagrams Cell 41 , Vehicle Dynamic Suspension for schematic and connector information.
The VDM requires an operating voltage that is between 9 and 16 volts. The VDM receives this voltage from the BCM . The VDM has a single ground circuit located in the engine compartment wiring harness. Excessive resistance or an open in one or more of these circuits, a discharged battery or a inoperative charging system will result in the VDM setting a DTC.
DTC Fault Trigger Conditions
| DTC | Description | Fault Trigger Conditions |
|---|---|---|
| Battery Voltage: Circuit Voltage Below Threshold | This DTC sets in continuous memory and on-demand if the voltage supplied to the VDM falls below 9 volts for more than 5 seconds. |
Make sure the vehicle battery terminals and cables are free of any corrosion and other contaminants.
Make sure the vehicle battery terminals are tightened to their correct torque specifications.
Make sure BCM fuse 32 (10A) is OK.
| Test Step | Result / Action to Take | ||||||||||||
|---|---|---|---|---|---|---|---|---|---|---|---|---|---|
| A1 RECHECK THE VDM DTCS | |||||||||||||
| Yes
GO to A2 . No The system is operating correctly at this time. The DTC may have set due to a previous low battery voltage condition. | ||||||||||||
| A2 CHECK FOR CHARGING SYSTEM DTCS IN THE PCM | |||||||||||||
| Yes
REFER to Section 414-00 to diagnose the charging system. No GO to A3 . | ||||||||||||
| A3 CHECK THE BATTERY CONDITION AND STATE OF CHARGE | |||||||||||||
| Yes
GO to A4 . No INSTALL a new battery. REFER to Section 414-01 . | ||||||||||||
| A4 CHECK THE VDM VOLTAGE PID | |||||||||||||
| Yes
GO to A7 . No GO to A5 . | ||||||||||||
| A5 CHECK THE VDM VOLTAGE SUPPLY | |||||||||||||
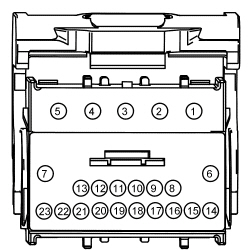 | Yes
GO to A6 . No VERIFY BCM fuse 32 (10A) is OK. If not OK, REFER to the Wiring Diagrams manual to identify the cause of the circuit short. If OK, REPAIR the affected circuit for high resistance or an open. | ||||||||||||
| A6 CHECK THE VDM GROUND CIRCUIT FOR AN OPEN | |||||||||||||
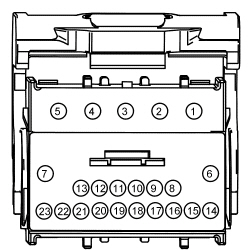 | Yes
GO to A7 . No REPAIR the affected circuit(s). | ||||||||||||
| A7 CHECK FOR CORRECT VDM OPERATION | |||||||||||||
| Yes
CHECK OASIS for any applicable TSBs. If a TSB exists for this concern, DISCONTINUE this test and FOLLOW the TSB instructions. If no TSBs address this concern, INSTALL a new VDM . REFER to Vehicle Dynamics Module (VDM) . No The system is operating correctly at this time. The concern may have been caused by a loose or corroded connector. ADDRESS the root cause of any connector or pin issues. | ||||||||||||
Pinpoint Test B: U3003:17
Diagnostics in this manual assume a certain skill level and knowledge of Ford-specific diagnostic practices. Refer to Diagnostic Methods in Section 100-00 for information about these practices.
Refer to Wiring Diagrams Cell 41 , Vehicle Dynamic Suspension for schematic and connector information.
The VDM requires an operating voltage that is between 9 and 16 volts. The VDM receives this voltage from the BCM . The VDM has a single ground circuit located in the engine compartment wiring harness. An overcharging condition in the charging system will result in the VDM setting a DTC. This DTC may also set in the VDM due to battery charging or vehicle jump starting events.
DTC Fault Trigger Conditions
| DTC | Description | Fault Trigger Conditions |
|---|---|---|
| Battery Voltage: Circuit Voltage Above Threshold | This DTC sets in continuous memory and on-demand if the voltage supplied to the
VDM
falls below 9 volts for more than 5 seconds.
This DTC may also set in the VDM due to battery charging or vehicle jump starting events. |
| Test Step | Result / Action to Take |
|---|---|
| B1 CHECK FOR HIGH VOLTAGE DTCS SET IN OTHER MODULES | |
| Yes
REFER to Section 414-00 to diagnose an overcharging condition. No GO to B2 . |
| B2 CHECK THE BATTERY VOLTAGE | |
| Yes
GO to B3 . No REFER to Section 414-00 to diagnose an overcharging condition. |
| B3 RECHECK THE VDM FOR DTC U3003:17 | |
| Yes
GO to B4 . No The system is operating normally at this time. The DTC may have been set previously during battery charging or while jump starting the vehicle. |
| B4 CHECK FOR CORRECT VDM OPERATION | |
| Yes
CHECK OASIS for any applicable TSBs. If a TSB exists for this concern, DISCONTINUE this test and FOLLOW the TSB instructions. If no TSBs address this concern, INSTALL a new VDM . REFER to Vehicle Dynamics Module (VDM) . No The system is operating correctly at this time. The concern may have been caused by a loose or corroded connector. ADDRESS the root cause of any connector or pin issues. |
Pinpoint Test C: Cannot Change Suspension Modes Using the Ride Control Switch
Diagnostics in this manual assume a certain skill level and knowledge of Ford-specific diagnostic practices. Refer to Diagnostic Methods in Section 100-00 for information about these practices.
Refer to Wiring Diagrams Cell 41 , Vehicle Dynamic Suspension for schematic and connector information.
When the ride control switch is pressed, a signal is sent to the PCM. The PCM interprets this signal and sends a message to the IPC over the HS-CAN . When the IPC receives this message, it sends a ride control mode change request message to the VDM over the HS-CAN . The VDM then adjusts the PWM voltage sent to the solenoids to adjust the suspension to the requested setting. A short to ground, voltage or an open in the ride control switch circuits between the PCM and the switch causes the switch to not function. A communication error between any of the 3 modules causes suspension mode change request concerns and also causes the VDM to set DTCs.
| Test Step | Result / Action to Take | ||||||||||||||||
|---|---|---|---|---|---|---|---|---|---|---|---|---|---|---|---|---|---|
| C1 CHECK FOR VDM DTCS | |||||||||||||||||
| Yes
DIAGNOSE all VDM DTCs before diagnosing the ride control switch. GO to the VDM DTC Chart. No GO to C2 . | ||||||||||||||||
| C2 CHECK THE RIDE CONTROL SWITCH CIRCUITS FOR A SHORT TO VOLTAGE | |||||||||||||||||
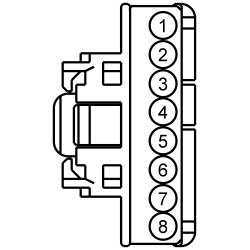 | Yes
REPAIR the circuit. No GO to C3 . | ||||||||||||||||
| C3 CHECK THE RIDE CONTROL SWITCH CIRCUITS FOR A SHORT TO GROUND | |||||||||||||||||
 | Yes
GO to C4 . No REPAIR the circuit. | ||||||||||||||||
| C4 CHECK THE RIDE CONTROL SWITCH CIRCUITS FOR AN OPEN | |||||||||||||||||
NOTE: The circuits pass through an in-line connector, C211, circuit RMC27 changes to RE405 at C211.
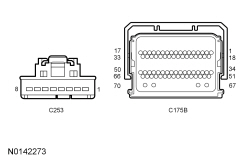 | Yes
GO to C5 . No REPAIR the circuit. | ||||||||||||||||
| C5 CHECK THE RIDE CONTROL SWITCH CIRCUITS FOR A SHORT TOGETHER | |||||||||||||||||
 | Yes
GO to C6 . No REPAIR the circuits. | ||||||||||||||||
| C6 CHECK THE PCM RIDE CONTROL SWITCH OUTPUT | |||||||||||||||||
 | Yes
INSTALL a new ride control switch. REFER to Ride Control Switch . No INSTALL a new PCM. REFER to Section 303-14 . | ||||||||||||||||
Pinpoint Test D: Damper Solenoid Electrical Fault DTCs
Diagnostics in this manual assume a certain skill level and knowledge of Ford-specific diagnostic practices. Refer to Diagnostic Methods in Section 100-00 for information about these practices.
Refer to Wiring Diagrams Cell 41 , Vehicle Dynamic Suspension for schematic and connector information.
The VDM sends a current to the damper solenoids based on HS-CAN messages. The VDM continually monitors the damper solenoid circuits and sets a DTC when a circuit fault is detected. A shorted or open damper solenoid also causes the VDM to set a DTC.
DTC Fault Trigger Conditions
| DTC | Description | Fault Trigger Conditions |
|---|---|---|
|
| These DTCs set in continuous memory and on-demand when the VDM detects a short to ground on one or both of the damper solenoid circuits for longer than 3 seconds. |
|
| This DTC sets in continuous memory and on-demand when the VDM detects a short to battery on one or both of the damper solenoid circuits for longer than 3 seconds. |
|
| This DTC sets in continuous memory and on-demand when the VDM detects an open on one or both of the damper solenoid circuits for longer than 3 seconds. |
Make sure the valve solenoid harness is routed correctly and is undamaged.
Make sure the valve solenoid electrical connector is free from any corrosion or other contaminants.
| Test Step | Result / Action to Take | ||||||||||||||||||||||||||||||||||||||||||||||||||||||||||||||||
|---|---|---|---|---|---|---|---|---|---|---|---|---|---|---|---|---|---|---|---|---|---|---|---|---|---|---|---|---|---|---|---|---|---|---|---|---|---|---|---|---|---|---|---|---|---|---|---|---|---|---|---|---|---|---|---|---|---|---|---|---|---|---|---|---|---|
| D1 CHECK THE VDM DTCS | |||||||||||||||||||||||||||||||||||||||||||||||||||||||||||||||||
| Yes
GO to D2 . No If DTC C110C:12, C110D:12, C110E:12 or C110F:12 is present, GO to D3 . If DTC C110C:13, C110D:13, C110E:13 or C110F:13 is present, GO to D4 . For all other VDM DTCs, REFER to the VDM DTC Chart. | ||||||||||||||||||||||||||||||||||||||||||||||||||||||||||||||||
| D2 CHECK THE DAMPER SOLENOID CIRCUITS FOR A SHORT TO GROUND | |||||||||||||||||||||||||||||||||||||||||||||||||||||||||||||||||
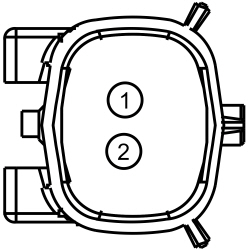 | Yes
GO to D5 . No REPAIR the affected circuit(s). | ||||||||||||||||||||||||||||||||||||||||||||||||||||||||||||||||
| D3 CHECK THE DAMPER SOLENOID CIRCUITS FOR A SHORT TO BATTERY | |||||||||||||||||||||||||||||||||||||||||||||||||||||||||||||||||
 | Yes
REPAIR the affected circuit(s). No GO to D5 . | ||||||||||||||||||||||||||||||||||||||||||||||||||||||||||||||||
| D4 CHECK THE DAMPER SOLENOID CIRCUITS FOR AN OPEN | |||||||||||||||||||||||||||||||||||||||||||||||||||||||||||||||||
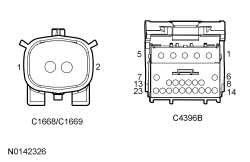
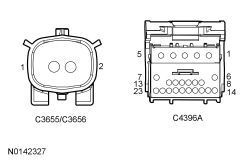 | Yes
GO to D5 . No REPAIR the affected circuit(s). | ||||||||||||||||||||||||||||||||||||||||||||||||||||||||||||||||
| D5 CHECK THE DAMPER SOLENOID CIRCUITS FOR A SHORT TOGETHER | |||||||||||||||||||||||||||||||||||||||||||||||||||||||||||||||||
 | Yes
GO to D6 . No REPAIR the affected circuit(s). | ||||||||||||||||||||||||||||||||||||||||||||||||||||||||||||||||
| D6 CHECK THE DAMPER SOLENOID RESISTANCE | |||||||||||||||||||||||||||||||||||||||||||||||||||||||||||||||||
| Yes
INSTALL a new VDM . REFER to Vehicle Dynamics Module (VDM) . No INSTALL a new front strut or rear shock absorber. For front struts, REFER to Section 204-01 . For rear shock absorbers, REFER to Section 204-02 . | ||||||||||||||||||||||||||||||||||||||||||||||||||||||||||||||||
Pinpoint Test E: U0100:87
Diagnostics in this manual assume a certain skill level and knowledge of Ford-specific diagnostic practices. Refer to Diagnostic Methods in Section 100-00 for information about these practices.
Refer to Wiring Diagrams Cell 41 , Vehicle Dynamic Suspension for schematic and connector information.
With the ignition ON, the PCM sends messages to the VDM over the HS-CAN . If the VDM does not receive these messages within a certain time frame, the module sets DTCs. For information on the messages sent to the VDM by the PCM, refer to the Network Message Chart in Vehicle Dynamic Suspension .
DTC Fault Trigger Conditions
| DTC | Description | Fault Trigger Conditions |
|---|---|---|
| Lost Communication With ECM /PCM: Missing Message | This DTC sets in continuous memory if the vehicle speed message is missing. |
| Test Step | Result / Action to Take |
|---|---|
| E1 CHECK THE COMMUNICATION NETWORK | |
| Yes
GO to E2 . No REFER to Section 418-01 to diagnose the PCM does not respond to the scan tool. |
| E2 CHECK THE VDM CMDTCs | |
| Yes
GO to E3 . No The system is operating correctly at this time. The DTC may have been set due to high network traffic or an intermittent fault condition. |
| E3 REVIEW THE RECORDED DTCS FROM THE VDM SELF-TEST | |
| Yes
For DTC U3003:16, GO to Pinpoint Test A . For DTC U3003:17, GO to Pinpoint Test B . No GO to E4 . |
| E4 CHECK FOR DTCS IN THE PCM | |
| Yes
REFER to Section 303-14 . No GO to E5 . |
| E5 CHECK FOR DTC U0100:XX SET IN OTHER MODULES | |
| Yes
CHECK OASIS for any applicable TSBs. If a TSB exists for this concern, DISCONTINUE this test and FOLLOW the TSB instructions. If no TSBs address this concern, INSTALL a new PCM. REFER to Section 303-14 . No CHECK OASIS for any applicable TSBs. If a TSB exists for this concern, DISCONTINUE this test and FOLLOW the TSB instructions. If no TSBs address this concern, INSTALL a new VDM . REFER to Vehicle Dynamics Module (VDM) . |
Pinpoint Test F: U0121:87
Diagnostics in this manual assume a certain skill level and knowledge of Ford-specific diagnostic practices. Refer to Diagnostic Methods in Section 100-00 for information about these practices.
Refer to Wiring Diagrams Cell 41 , Vehicle Dynamic Suspension for schematic and connector information.
With the ignition ON, the ABS module sends the VDM messages over the HS-CAN . If the VDM does not receive these messages within a certain time frame, the module sets DTCs. For information on the messages sent to the VDM from the ABS module, refer to the Network Message Chart in Vehicle Dynamic Suspension .
DTC Fault Trigger Conditions
| DTC | Description | Fault Trigger Conditions |
|---|---|---|
| Lost Communication With ABS Control Module: Missing Message | This DTC sets in continuous memory if the ABS module ESC damper state request message is missing during an ESC event. |
| Test Step | Result / Action to Take |
|---|---|
| F1 CHECK THE COMMUNICATION NETWORK | |
| Yes
GO to F2 . No REFER to Section 418-01 to diagnose the ABS module does not respond to the scan tool. |
| F2 CHECK THE VDM CMDTCs | |
| Yes
GO to F3 . No The system is operating correctly at this time. The DTC may have been set due to high network traffic or an intermittent fault condition. |
| F3 REVIEW THE RECORDED DTCS FROM THE VDM SELF-TEST | |
| Yes
For DTC U3003:16, GO to Pinpoint Test A . For DTC U3003:17, GO to Pinpoint Test B . No GO to F4 . |
| F4 CHECK FOR DTCS IN THE ABS MODULE | |
| Yes
REFER to Section 206-09 . No GO to F5 . |
| F5 CHECK FOR DTC U0121:XX SET IN OTHER MODULES | |
| Yes
CHECK OASIS for any applicable TSBs. If a TSB exists for this concern, DISCONTINUE this test and FOLLOW the TSB instructions. If no TSBs address this concern, INSTALL a new ABS module. REFER to Section 206-09 . No CHECK OASIS for any applicable TSBs. If a TSB exists for this concern, DISCONTINUE this test and FOLLOW the TSB instructions. If no TSBs address this concern, INSTALL a new VDM . REFER to Vehicle Dynamics Module (VDM) . |
Pinpoint Test G: U0155:87
Diagnostics in this manual assume a certain skill level and knowledge of Ford-specific diagnostic practices. Refer to Diagnostic Methods in Section 100-00 for information about these practices.
Refer to Wiring Diagrams Cell 41 , Vehicle Dynamic Suspension for schematic and connector information.
With the ignition ON, the IPC sends the VDM messages over the HS-CAN . If the VDM does not receive these messages within a certain time frame, the module sets DTCs. For information on the messages sent to the VDM by the IPC , refer to the Network Message Chart in Vehicle Dynamic Suspension .
DTC Fault Trigger Conditions
| DTC | Description | Fault Trigger Conditions |
|---|---|---|
| Lost Communication With IPC : Missing Message | This DTC sets in continuous memory if the damper mode change request message is missing. |
| Test Step | Result / Action to Take |
|---|---|
| G1 CHECK THE COMMUNICATION NETWORK | |
| Yes
GO to G2 . No REFER to Section 418-01 to diagnose the IPC does not respond to the scan tool. |
| G2 CHECK THE VDM CMDTCs | |
| Yes
GO to G3 . No The system is operating correctly at this time. The DTC may have been set due to high network traffic or an intermittent fault condition. |
| G3 REVIEW THE RECORDED DTCS FROM THE VDM SELF-TEST | |
| Yes
For DTC U3003:16, GO to Pinpoint Test A . For DTC U3003:17, GO to Pinpoint Test B . No GO to G4 . |
| G4 CHECK FOR DTCS IN THE IPC | |
| Yes
REFER to Section 413-01 . No GO to G5 . |
| G5 CHECK FOR DTC U0155:XX SET IN OTHER MODULES | |
| Yes
CHECK OASIS for any applicable TSBs. If a TSB exists for this concern, DISCONTINUE this test and FOLLOW the TSB instructions. If no TSBs address this concern, INSTALL a new IPC . REFER to Section 413-01 . No CHECK OASIS for any applicable TSBs. If a TSB exists for this concern, DISCONTINUE this test and FOLLOW the TSB instructions. If no TSBs address this concern, INSTALL a new VDM . REFER to Vehicle Dynamics Module (VDM) . |